Blog

Kuuki no Sukima – sonic analyses

In my blog Closer look at the Score dated 1. March 2018, I did analyze conducting instructions in the opening measures of Kuuki no Sukima. How the conductor had to press the start button (3rd. button) and then the tempo button (4th. button) four times to set the tempo and finally close her fist to activate the volume control.

Sonic analyzes

In this blog, I will focus on the sonic part of the concert, ie. how the sound of the instruments interacts with the electronic sound effects of the computer. I will, as far as it goes, try to showcase the relationship between written notation and a sonic experience. How I use traditional notation in conjunction with “traditional” graphical interface of music software applications. Commonly called “Automation” a control whose value changes in the course of a timeline that is automated.

So, once again let’s take a look at the opening measures of Kuuki no Sukima.
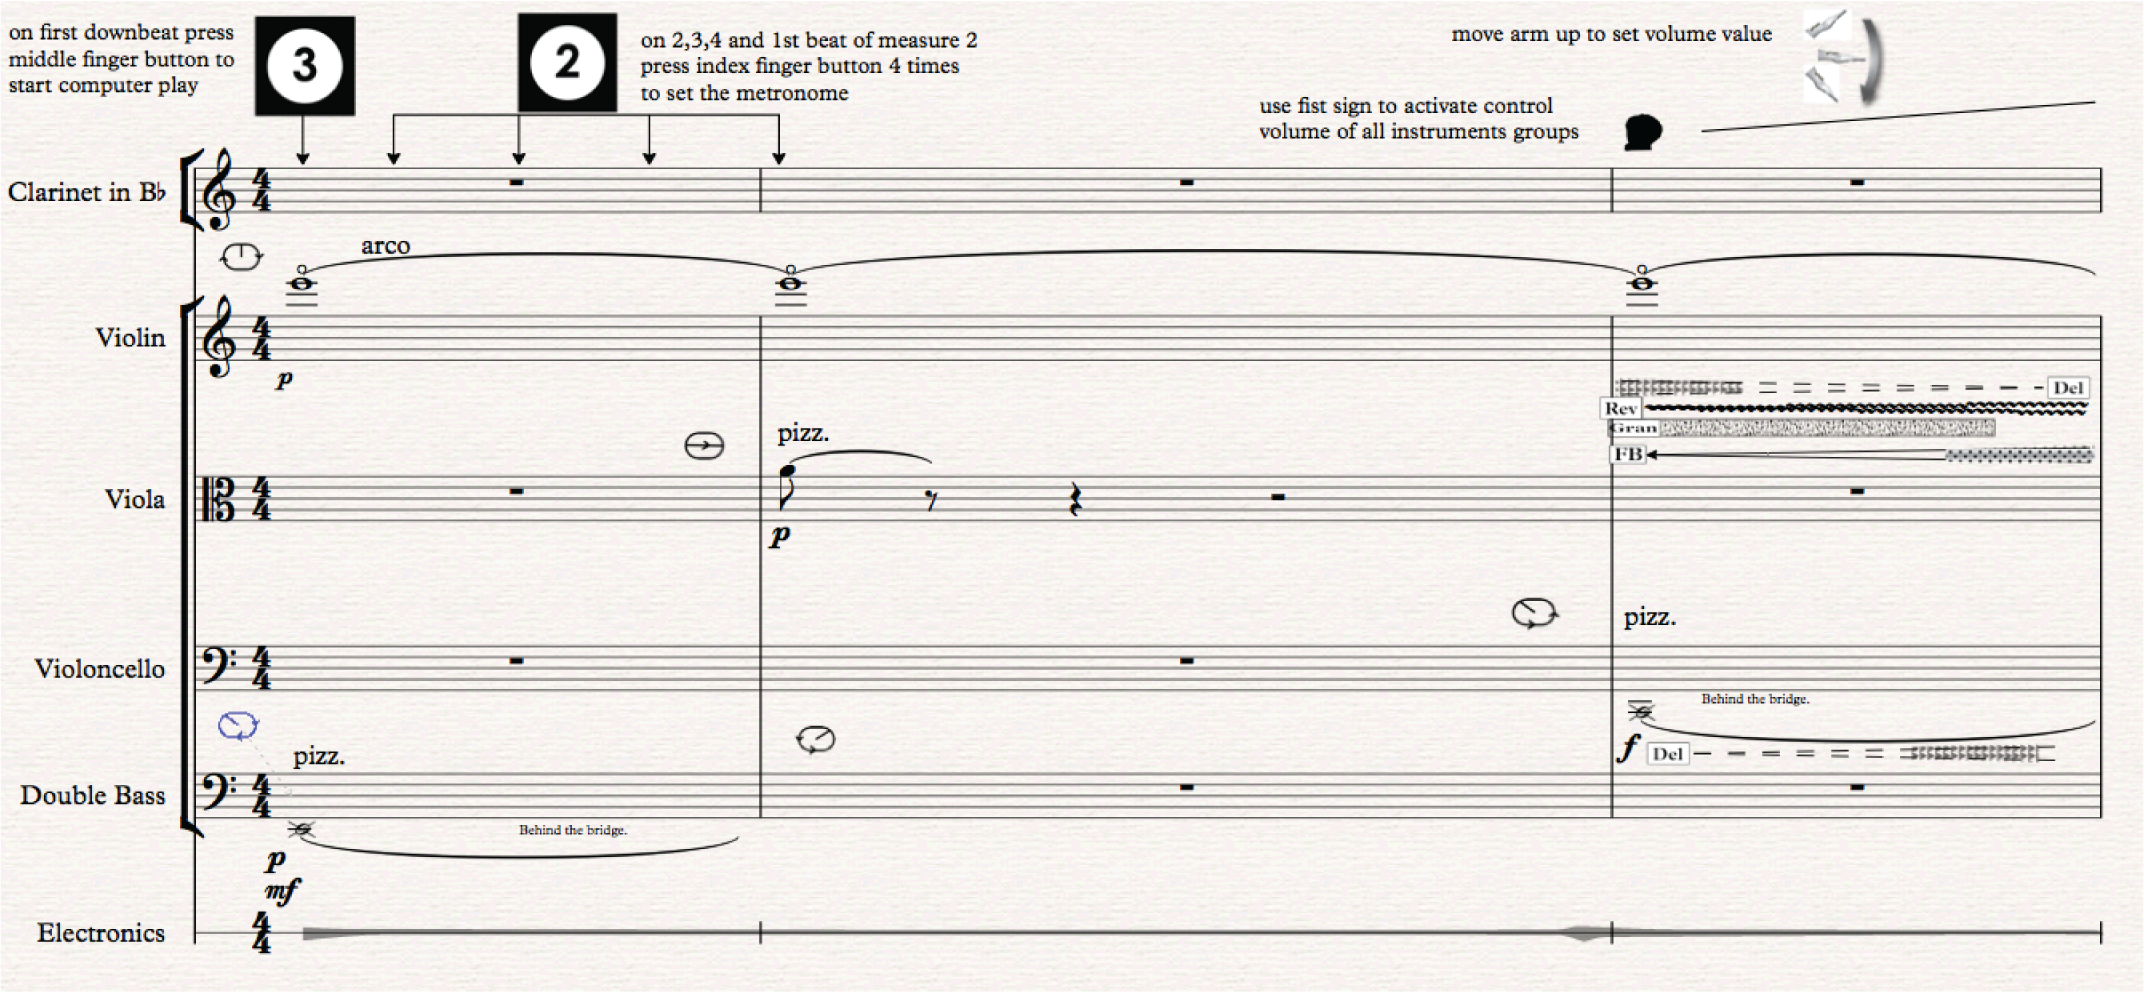
In the opening measures there is no use of electronics and therefore there is a clear dry sound of the instruments until the conductor activates the volume control by closing her fist and raise her arm.  At that point, approximately at the beginning of measure three, the conductor increases the volume of the electronic sounds from cero or no electronics to the level she wants the electronics to be. This is a slight change from the original version where the electronics were supposed to be from the beginning. Why these changes? As mentioned in an earlier blog, this was done to simplify the actions the conductor had to perform at the beginning of the work. Aesthetically it worked out to be a stronger beginning and gave the composition more expressive opening with the electronics fading in with a visual realization or gesture of the conductor raising her arm.

Notated Score and the DAW Interface connection

As can be heard the sound of the Violin start to change in 3rd. measure as soon as the conductor raises her hand. The sounds of the other instruments, the pizzicato with a delay in Cello and Viola. The fast airy note pattern (arco battuto) in the Double Bass, where delay and granulation are increasingly affecting the sound is not as clear. Why?

Lets first take a closer look at the score and the electronic score to figure out how things are connected or related.
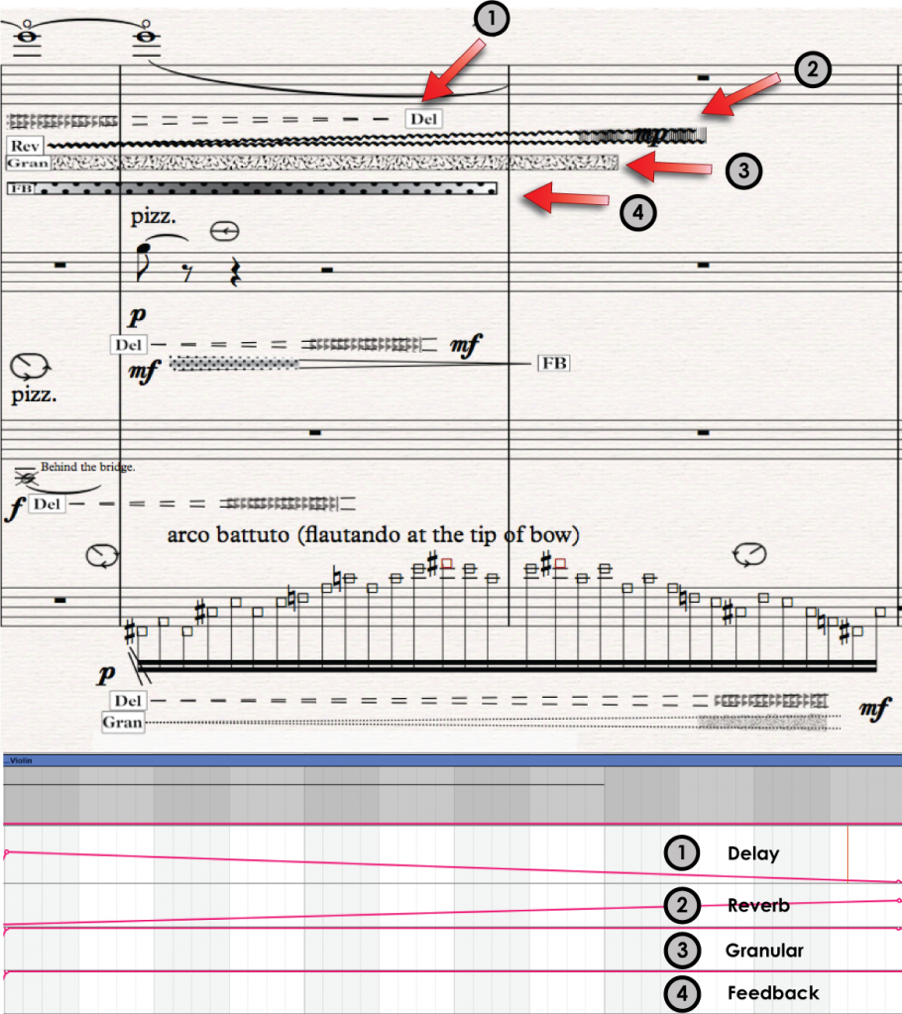
The above illustration shows the connection between the notated score and the graphical interface of the computer application or DAW in short for Digital Audio Workstation. Focusing on the Violin part, the computer electronics are added to the high opening note (E).

  1. Delay with diminuendo (decreasing volume) from approximately mf to silence.
  2. Reverb fades in with increasing volume to approximately mp (relatively little reverb)
  3. Granulation starts with ff or very strong and stays unchanged.
  4. Feedback starts with ff (very strong) and stays unchanged.
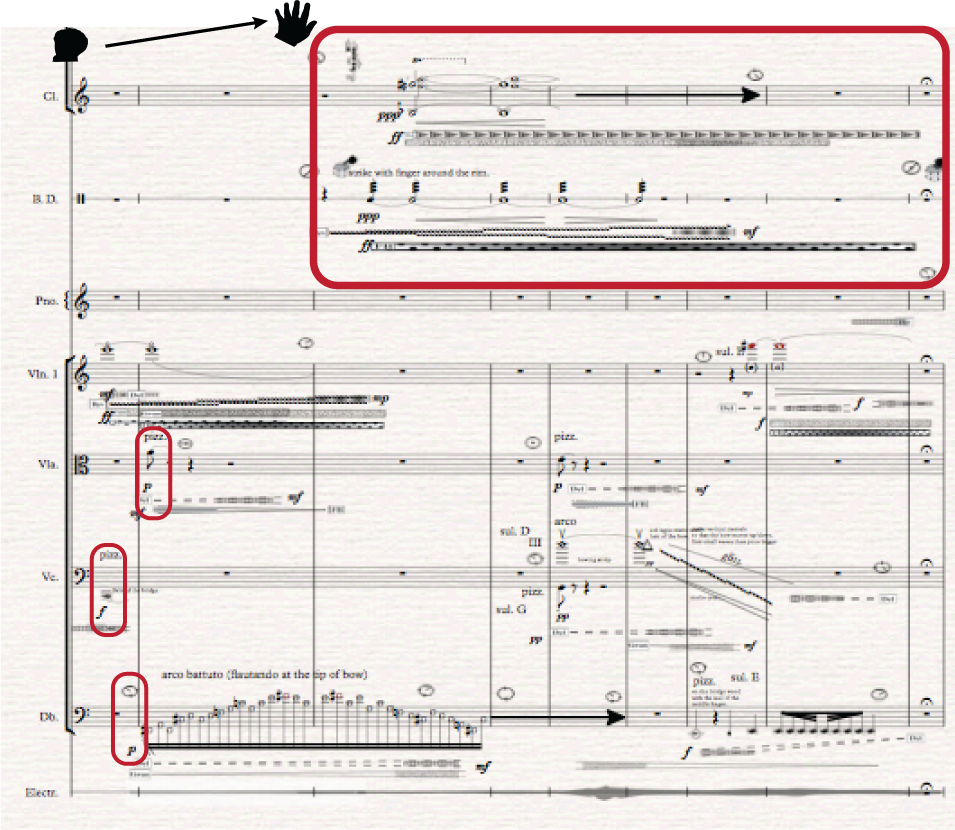
The above figure shows how the other instruments, Viola, Cello and Double Bass add effects that increase or decrease same way as shown the Violin part. But how come they are not as easily audible as the high Violin pitch?

Fist the loud pizzicato in Cello in measure 3 comes right at the beginning of the conductor’s increase of the electronic volume. Therefore the expected delay effect that is written in the score is not audible. The following Viola pizzicato in measure 4 has an increasing delay and decreasing feedback. It can hardly be heard most likely because the pizzicato is soft (p) and the conductor still hasn’t raised the volume to its maximum value. For the same reason, Double Bass fast airy note pattern starting in measure 4 is not very clear. It should also be mentioned that the volume of the Double Bass is too soft and will be adjusted in next revised version.

The use of electronic effects in Bass Drum and Clarinet entrance in measure 5 should be more audible and closer to the sonic spectrum that is expected. Especially the Clarinet, since although written ppp (very soft) is played louder than for instance the Double Bass. Keep in mind that the Clarinet can´t play the multiphonics very loud and therefore the ppp indicates as soft as possible (should be written in the score). Similarly, the Bass Drum can´t play the finger strike very soft although softer than the Clarinet. The Clarinet multiphonics gives a very rich sound that is high in frequency that should be ideal for picking up electronics, unlike the Bass Drum that has a low-frequency and therefore less audible affectation.

For some reason, that might be related to the choice of effects, the Clarinet multiphonics, and the Bass Drum finger strike seems to pick up very little electronics, much less than expected. The intensity, for instance, Delay and Granular in Clarinet are written ff or very strong that should give maximum effect. It could be my mistake to write a Delay for a sustained note since it can only be delayed at the beginning and I might have to take a closer look at the granulation. For the final version, I will change the Delay effect with a Feedback effect which should give richer sonority as well as adjust the granulation.

Instrument – electronic sound relation.

Here we come to very interesting complications. First of all, the harsh reality of working in the media of mixed music, where there is very often a very little time to work with the performers. It means that tests have to be done by computer simulation. Although I did meet with most of the players during the preparation and composing period I did not have time to adjust the electronic sound effects. Most of the time with the performers was spent working on the extended instrument technique, both the physical aspect and the notation as well as the sonic, how this and that did sound in practice. These are all very time-consuming factors and although the performers were all very positive and helpful there was hardly any extra time for adding the electronics.

Working with Violinist Ina

Same happened during the rehearsal period before the premiere performance in November, most of the time went getting the right acoustic sound without the electronics. It was not until the last rehearsal that the electronics were added with a sigh of release and surprise from the performers. I am not sure why this happens but it seems to happen very frequently in the world of mixed media. One obvious factor is that usually the electronic equipment, loudspeakers, microphones, mixer etc. are not in place until the last minute. But that was not in this case since all equipment was in place right from the beginning. The fact that there were three other works on the program that took significant time to rehearse left too little time. The fact that the conductor is classically trained might have something to do with it. She did spend a lot of time getting the right sound without the electronics, the right balance and other expressions that are important in classical performance. Perhaps the fact that she had to wear a glove to conduct the electronics, the fact that she had to press buttons to move or jump to right markers in the score. The fact that the conducting glove could be more user-friendly. For instance, you could not jump to whatever measure you need to practice or in other words the flexibility of the technology was not good enough. Maybe it was the conductor’s theory, that if the instrumentation was correct then the electronics would be correct a theory that I agreed upon at the beginning. Looking back it might have been a failure since it turned out that the performers did complain that they did not have enough time to learn how the electronics would react towards their performance. The ideal situation would have been a week-long workshop focusing no Kuuki no Sukima only. But that situation is rear and we have to keep in mind that the aim of the research was to create a musical tool for conductors that would be easy enough to use under “normal” situation. Therefore, one could say that the ConDiS prooved to be a successful tool since the conductor did manage to conduct and control the electronics during the performance.

Since all the electronic sounds are totally related to their instrument, there to say the electronic sound of the Violin is based on the sound the Violin is playing at that time. In other words, it is a live real-time sound processing of the Violin. Therefore, if the Violin plays a soft note the electronics are going to be soft and vice versa.  Low frequency its going to sound different than a hight one.

This is problematic since although there is written an ff, meaning a very loud use of the effect, it does not mean that the outcoming sound is going to be loud. It means that the electronic sound is having a large effect on the played tone whether that tone is loud or soft.

In measure 5 the conductor has increased the electronic sound level to the desired point. Keep in mind it is totally up to the conductor to adjust the volume like she does when conducting the “other” instruments. Soon thereafter the Bass Drum and Clarinet start to play. It is possible that the conductor has not adjusted the volume level loud enough but by comparing the three different performances is seems not to be the fact. Let’s look and listen to an example.
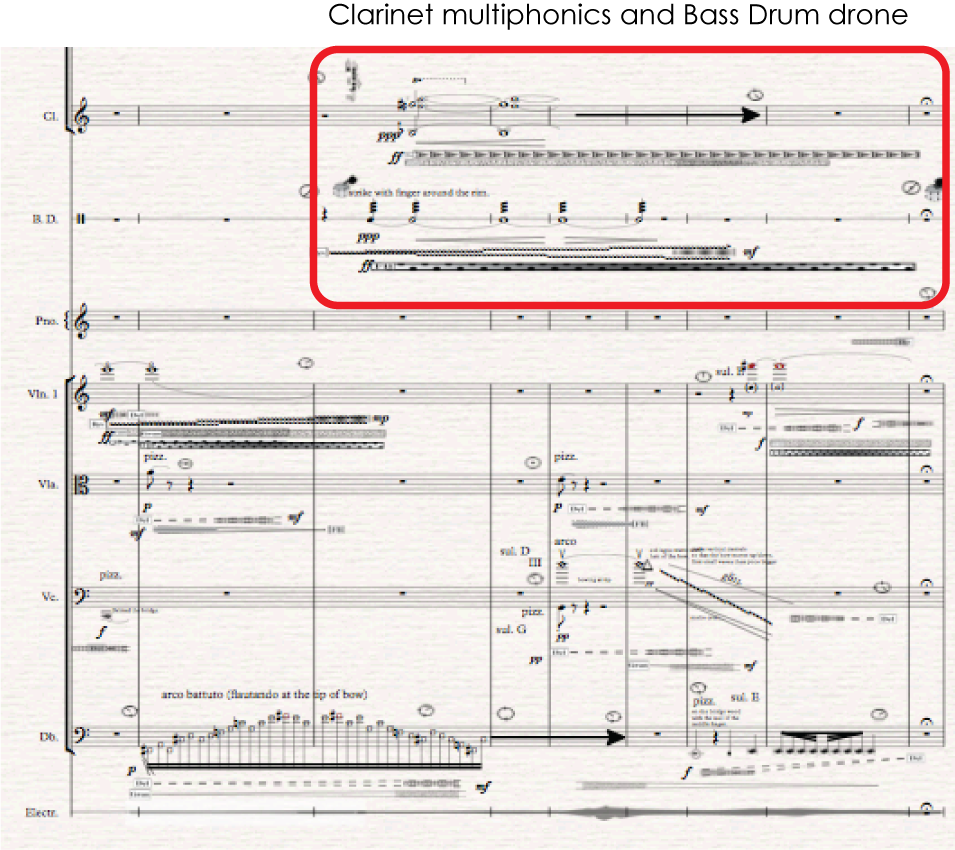
Example measures 5-11 from Harpa Concert

Example measures 5-11 from Torshavn Concert

Example measures 5-11 from Copenhagen Concert

As said before here I was expecting more sound processing, especially in the Clarinet.  Why? The Clarinet is playing multiphonics that has relatively rich and high pitch. Therefore the electronic sounds should be clear. It is a bit different with the Bass Drum that is playing a deep drone. Although the multiphonics for the Clarinet is written as very soft (ppp) it is not possible to play them much softer than we hear on the recording. This is also a very good example of the inaccuracy of classical note writing since the ppp means as soft as possible but the relative loudness is more like and mf (mezzoforte) or medium loud.

Other facts that might count is that the conductor’s adjustment of the volume level is not right. The Violin that comes in measure 9 supports the theory because there the conductor has increased even more the electronic sound, and therefore it is much more audible.

Let us now see and hear the opening measures from the Harpa performance with score and illustrations.

Measure 11 – 14.

In measure 11 there is a general pause where the conductor stops the play button of the electronics by pressing the 3rd button. After the pause, the conductor continues by pressing the 4th button which jumps the playback-head of the DAW to exactly the beginning of measure 12.  That synchronizes the DAW and the notated Score so that the Bass Drum and Piano duo should be exactly in sync with the effects of the electronics.
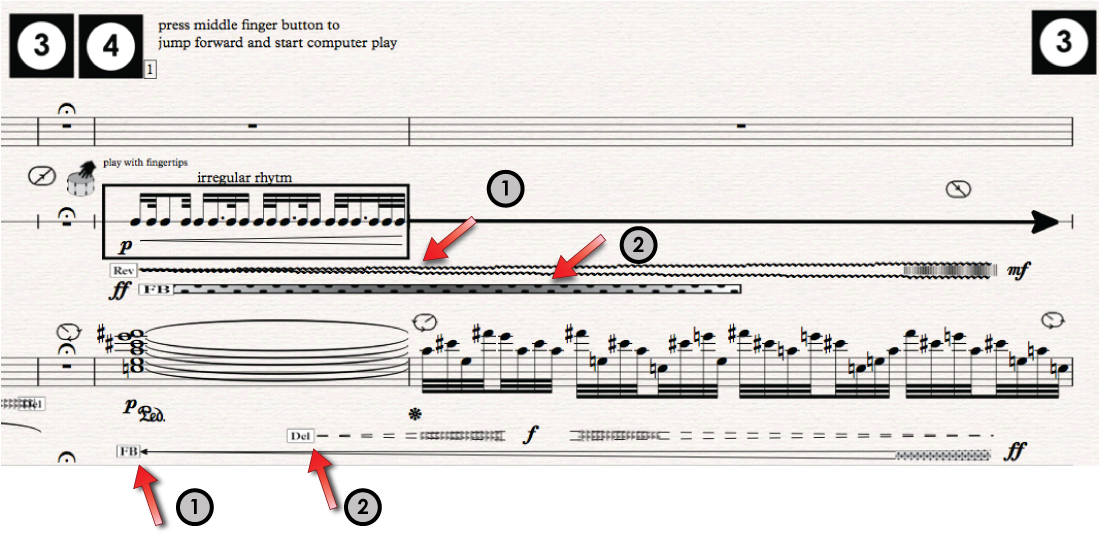
As shown in the figure above Bass Drum comes in with increased reverb and strong feedback effect while the piano has increased feedback, as well as increased —> decreased delay.

Bass Drum – Piano

  1. Reverb crescendo to mf (mezzoforte) medium loud. Feedback with unchanged ff (fortissimo) strong effect.
  2. Delay crescendo to f (forte) —> diminuendo to cero. Feedback from cero to FF (fortissimo/very strong).

Now, look at the automation for the same measures as written in the automation of the DAW.

Empirical studies of ConDiS Conducting (part2)

When I started to work with conductor Halldis Rønning at the beginning of October 2017, I soon realized that I had been on a slightly wrong track. My expectations of having the conductor “grabbing” the sound throw it into the air and making live sonic modulations were not real. Although possibilities that I proved to be possible (see a demo video of Pan control and Fx control), it was not the job of the conductor. Therefore after the skype meeting with Halldis, I went back to the drawing board and throw out both the Pan control and Fx control units of the interface.

The conductor interface before October 2017 with Pan and Fx control.
The conductor interface after October 2017. Without Pan and Fx control.

The following weeks the collaboration with me sending more and more detailed versions of the Score of Kuuki no Sukima led to the point that we decided to meet in Trondheim on October 31st for an intensive workshop. That included going through the composition with a playback from a virtual computerized version. That way Halldis could rehearse conducting the performance following the written instructions on when to start and stop the piece when to change tempo and how to change the overall volume value when needed. To my relief, the rehearsals went very well, Halldis felt quite comfortable using the ConDis System and was from the beginning very positive about this experimental. I found out that all my effort to write in the score the use of effects meant almost nothing to her. She was not used to reading increased delay or decreased feedback information and therefore she felt this information just made the score more complex to read. In an interview, I had with Halldis after Nordic Tour she told me that it would be nice if she could see some kind of indication of the loudness of the electronic sounds. She still telt the hairpins too complex and complicated to read on the conducting score.

This led me to the conclusion that perhaps I needed two kinds of scores. One score for the Composer and the Conductor to analyze and understand what the electronic was supposed to do in context with the acoustic music. The other score would be a performance score for the conductor to use during a performance with much less information and much more like a classical musical score.

A bit disappointing, since I really thought that I had come with a simple solution to extend the classical notation vocabulary. Simple since it was so closely based on the tradition of using hairpin graphics to express a change in instrumental volume values. It was my sincere belief that using the same icon, slightly altered, to express changes in electronic effect values would be the perfect simple solution. It still is my sincere belief that a simple solution has to be found, perhaps it needs to be thought of from a totally different perspective, a different angle. Perhaps I haven’t realized it because the answer is too close.

For the purpose of extending my own compositional goal, that is, to be able to write live interactive electronics into the musical score. To write them with the same precision as the instrumental notes. To have them conducted and performed with the same expression.  I have developed a writing that I understand and can use to express my compositional needs. Therefore, the solution of having to write two versions of the same score, one score for musical preparation and another simpler for performance, is a solution that I can live with at least for time being.

Working with Halldis that day was more than rehearsing and talking through the function of ConDiS but also a walk through the notation that I use for extending technique especially in the string part. In Kuuki no Sukima I use more extended instrumental technique than I have ever done before. In the pre-compositional process, I felt an urgent need to explore new lands of instrumental sonority and experiment and explore the possibilities, hence to the title “Kuuki no Sukima”.

The title can be transcribed literally as “the gap of the air” or even ”in between the air” both very suitable for the composer’s vision of creating a sonic landscape of sounds that are somewhere there, in-between or in the gap of being a sound or a pitched note.

If sonority is a vibration of a traveling air pressure, could there be a gap?

Could there be a sonic world somewhere there in-between the air?

To get a better grasp of the sonority that I was looking for I asked three performers of the Trondheim Sinfonietta to be available that day, to be with us and realize, through discussions and performance some of my notation or written indications.

To create my own library of extended notation graphics I decided not to invent the wheel but to do some research on other composers works using external techniques. Especially useful I found the notation of composer Kaija Saariaho (Laconisme de l’Aile, 1982 ) and flutist/composer Robert Dick (The other Flute, Flying Lessons).

In my blog on March 9th, 2017 I wrote the following:

Closer look at the Score

I wrote in my blog Kuki no Sukima – Starting the performance:

“This has also led to the conclusion that I have to change the order of the button so that the index finger (button 2) is not used for metronome setting but rather for start/stop messages. The middle finger (button 3) will be used for jumping forward messages and ring finger (button 4) for the metronome setting. That should give a bit more natural finger combination since most of the indications are start/stop (2nd button), jump forward (3rd button) and metronome setting (4th button)”.

These changes did not work mainly since the conductor did not like to change settings that she already had realized. Hence back to the original layout.

The volume problem that I did write about in the same blog, i.e. how to set the volume to a sudden value at the beginning of the piece was solved by giving the conductor two measures to activate the volume control  as 

This solution seemed to work very well since it:

  1. gave the conductor more confidence adjusting the electronic volume
  2. gave the opening a bit more breath or space to open up
  3. showed clearly the use of ConDiS
  4. aesthetically more graceful opening

The other changes that were made from the first performance were that now the conductor gives a start playing sign by clicking 3rd button on the first downbeat before clicking the 2nd button four times to set the metronome.

This solution worked very well and seemed to be almost foolproof since there was no problem starting the performance with synchronization right at the beginning but unfortunately there were few instances that the metronome gave a wrong message that had to be corrected manually. What causes this failure is still a mystery but did happen several times when the conductor had to indicate tempo changes. Something that has to be corrected and might be a loose wire contact with the 2nd button.

When the electronic volume value has been set the conductor deactivates her control by open up her fist as shown in next example: 

Kuuki no Sukima – Instructions/Illustrations

Probably the most common reaction from the audience after the performance of Kuuki no Sukima was: What did the conductor do with the glove?

These reactions were exactly the reactions that I was hoping for since they proved to me that I had succeeded one of my primary goals. Throughout the entire development and research process, my main goal was to expand the conductor’s ability to control the electronics, as “natural” as possible, without any extra-musical gestures or other show-off gimmicks.

I will now take a closer look under the hood an illustrate what the conductor is doing in the first three minutes of the piece.  It might be surprising to you how busy the conductor is conducting the electronics (the computer) during these opening minutes.

Conducting gestures

The following video explains in more details what the conductor has to do in the opening measures of the Kuki no Sukima.

Although the beginning went quite well, there were a few things that could be done better or even needs to be changed.

  • The conductor starts the piece by clicking the start button (button 3 or middle finger button):

It looks as the conductor clicks the start button and then raises her arms to give the first downbeat.

It was my intention that the conductor should start exactly at the same time as she gives the downbeat (first beat) to the ensemble. By doing so the computer (electronics) and the ensemble are approximately one beat out of synchronization the first twelve measures or until the first “jump forward” appear in measure thirteen.

This seems to be a miscommunication between me and the conductor perhaps I was not clear enough when giving instructions. Should be easily fixed before next rehearsal. Perhaps a short Skype would be enough.

  • There is no metronome clicking to synchronize the conductors “intended” beat and the computer “preset” beat.

As mentioned in my last blog this was totally my fault, since I decided to leave out the conductor metronome setting and do it manually. The outcome was that the conductor was conducting in a slightly faster beat than the computer. Therefore the ensemble was always a bit ahead of the computer (electronics) although the “jump forward” button did corrections quite frequently.

Kuki no Sukima – The beginning

The following are seven short instruction videos made to follow up on what I wrote in my last blog. Hopefully, it helps the reader to understand the functionality of the ConDiS system.

The first part written instructions in the conductor score are explained.

A bit closer look at the instructions:

After the conductor has activated the volume control she can adjust the volume value of the electronic sound by moving her arm up and/or down.

Few other extra things the conductor needs to do before starting the piece.

    The conductor has to set the metronome for the piece which in this case is metronome 48. To do so she needs to press the index finger button four times in the tempo of the written metronome.

After setting the metronome the conductor has to press the nr. 3 button to tell the computer that she has set the metronome.

Now all is set and the conductor can start the piece by clicking the nr. 3 button once more as she gives the computer and ensemble a downbeat sign to start playing.

Kuki no Sukima – Starting the performance


My first reflexion is focused on the use of the ConDis technology and its functionality both for practical and artistic use. A sequence of short videos is in the making in order to make it easier for others to follow and hopefully comment. I apologize that the first video is a bit amateurish hence my limited experience in the world of video making. Hopefully, that is going to change as I get more experienced.

Looking at the first page of my composition Kuki no Sukima – Between the air, we can see in the upper left-hand corner of the opening page that the conductor has to do some preparations before starting the piece.

  1. OK sign to activate the Volume interface of DAW
  2. Click the 3rd. finger button to activate play-head button of the DAW
  3. Click the 2nd finger button four times to set the tempo
  4. Close your hand to activate the Volume Value Control
  5. Move arm up or down to set the Volume Value
  6. Open your hand (five fingers out) to deactivate the Volume Value Control

First, she needs to give an OK sign with left hand wearing the Conducting Glove (ConGlove). That gives an indication to the computer to activate the Volume control unit of the ConDiS interface. Then she needs to close her hand to activate the volume control levels and raise her arm a bit. That will set the volume level of the electronics.


Also, pay attention to the Vol_Pan_Fx_selector that indicates finger positions from little finger slider-values to the left to thumb too far right. When the OK sign is given the index finger and thumb go down.

After activating the volume the conductor has to give the given tempo by clicking her index finger (finger no.2) three times, indicated with.

button 2 = set metronome

ConDiS Reflections 1

Got recordings from the performance of Kuki no Sukima at the Dokkhuset in Trondheim, November 24th. Only had time to listen to in once and schedule all next week to listen to it over and over to reflect on the outcome. The reflection made is totally in relation to my research meaning that I will focus on the use of ConDiS as an additional composing tool and my use of it. Saying that it will be impossible for me to do so without analyzing my own composition Kuki no Sukima in relation to practical and sonic result. I will have to raise questions related to whether or not the composition is adding to the possibilities the Conducting Digital System is offering. Could the piece be performed without the system, are there other possibilities etc.

It is my aim to be able to go thoroughly through every instrument and every related electronic sound that was supposed to be synchronized. Why did some things work so well while others did not? Why did I get this low bass feedback when the bass drum was playing a long sustained drone. What can I do to get that sound right? Why did I not get any delay or procrastinate effect on the strings? Where did that eternal reverb come from? Why did the metallic sound of the piano and vibraphone sound so much better than the string. I could go on and on.

It is my aim to go through the conductor’s use of the ConGlove. Was ConDiS doing what it was supposed to do? Why is there as a sudden change in volume at least three times during the performance, where it was not supposed to be. What can I do to correct it? Why was there never an expressive gesture where the conductor would raise the volume level, let’s say after an attack of one or more instrument? What can I do to get more expressive gestures? Do I need to do compositional changes to get the conducting gestures and sonic textures more audible?

I will be reporting my reflections during next weeks using words audio and illustrations. I hope it will be to an interest to others and would be very grateful to receive comments.