In this chapter, I present an analysis of the written musical score in conjunction with audio and video recordings made during the Nordic Tour. I reflect on the technical implementation of the ConDiS system with regard to its use for musical performance. I explain the performance preparation, the connection between the written score and the DAW, and the conductor’s use of ConDiS during a performance—paying due attention to both the positive and negative experiences and discoveries.
In an effort to simplify descriptions and facilitate understanding of the process and outcome, I will use video examples from concerts, video clips from an interview with conductor Halldis Rønning, and questionnaires sent to members of the Trondheim Sinfonietta to supplement the text provided here.
Performance preparation
Score and DAW Synchronization
In order to better the functionality of the ConDiS system, both for practical and artistic use, we need to take a closer look at the score and DAW synchronization. I will start by examining the performance preparation for the first version of Kuuki no Sukimaused at the trial performance at Dokkhuset and then compare that to the later version of the score, which will provide excellent insight into the process that took place during the ongoing development of the project. A sequence of short videos is used to illustrate and enhance the discussion presented here.
Kuuki no Sukima – The Dokkhuset concert
Performance Preparation
Before entering the stage, the conductor needed to prepare the performance by carrying out the following actions:
- Activate the x-OSC sensor by turning on the on/off switch located on the wrist of the conducting glove.
- Press the 3rdfinger button once to stop the playback function that starts when the sensor is turned on.
- Press the 5thfinger button twice to set the DAW play-head to the beginning.
- Select the OSC network on the laptop.
- Activate the calibration toggle on the ConDiS interface. Open and close hand three times for finger recognition. Deactivate calibration toggle.
Now everything is set for the conductor to walk onto the stage.
Figure 52 shows the opening page of the first version of Kuuki no Sukima – Between the Air. Instructions are provided in writing that indicate what the conductor needs to do in the opening measures of the piece.
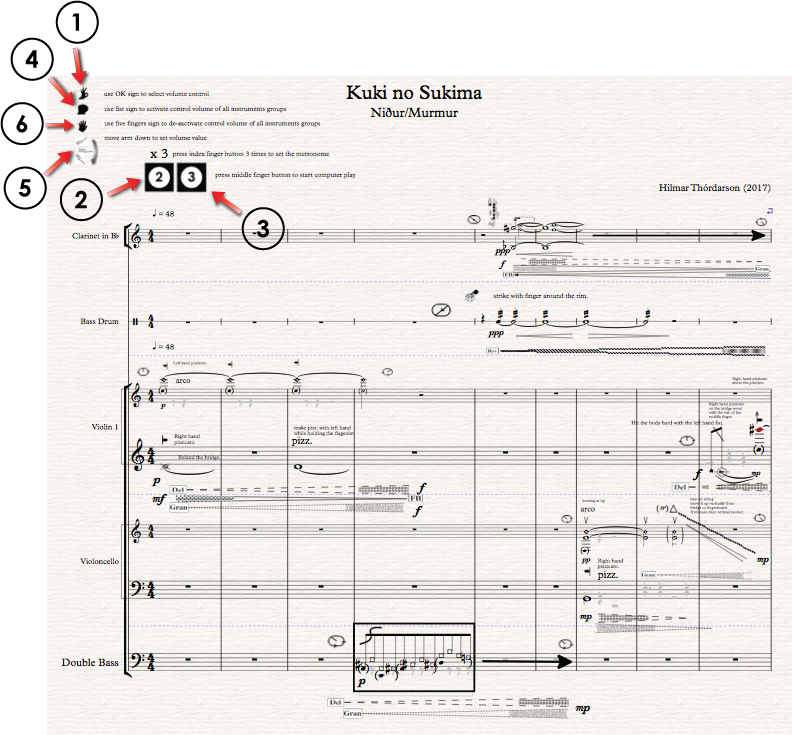
Figure 52. The opening page of Kuuki no Sukima 1st movement. The first version of the composition as performed at Dokkhuset.
When on stage the conductor needs to complete the following actions to start the performance:
- OK sign to activate the volume interface of DAW.
- Click the 2ndfinger button three times to set the tempo.
- Click the 3rd finger button to activate play-head button of the DAW.
- Close her hand to activate the Volume Value Control.
- Move arm up or down to set the Volume Value.

First, the conductor needs to give an OK sign with her left hand, on which she is wearing the ConGlove. This tells the DAW to activate the Volume Control Unit of the ConDiS interface.
After activating the volume (OK sign), the conductor has to give the written tempo by clicking her index finger (finger no. 2) three times in tempo. As indicated on the page by:

Figure 54. Button 2 = set metronome. Click the second button three times in a given tempo.
That sets the metronome of the DAW somewhere close to the given tempo (metronome
 = 48), depending on the conductor’s accuracy.
Now the conductor is ready to start the performance by pressing button three.

Figure 55. Start performance
Press button three to start the performance.

Figure 56. Closed hand
The conductor needs to close her hand into a fist to activate the volume control levels and raise her arm a bit. That will set the volume level of the electronics.
The Responding Graphical Interface
Figures 57 and 58 illustrate the operation of the ConDiS digital interface when activated.
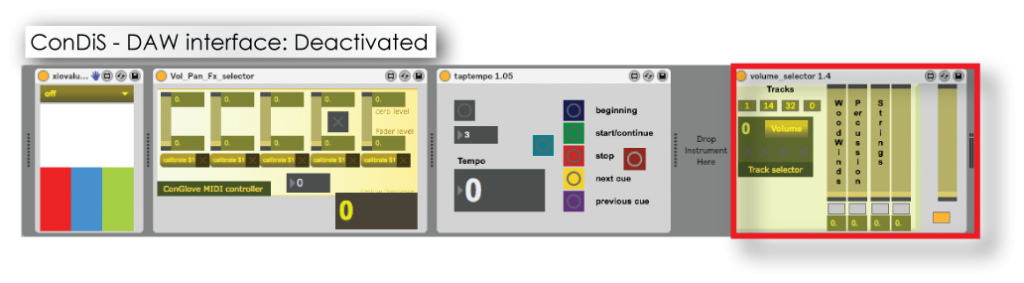 Figure 57. The ConDiS system de-activated. Red frame showing the volume selector with sliders at volume 0.
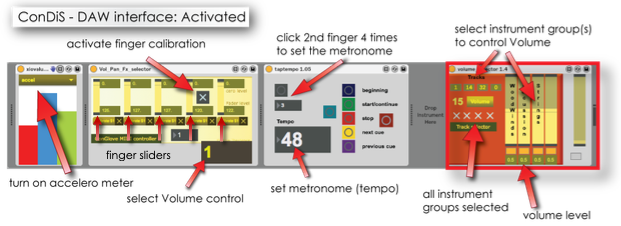
Figure 58. The ConDiS system activated. The accelerometer activated, finger calibration on, tap tempo and metronome set, and volume levels up (turned red).
From left to right:
- Accelerometer, to calculate arm position.
- Vol_Pan_Fx_selector, which indicates finger positions from little finger to the left to thumb far right.
- Tap Tempo – Calculates the average time between 2ndfinger button clicks. In this example, number 3 is selected for average metronome of four clicks (0-3). Any number can be set for tempo calculation.
This process of preparation turned out to be complex and confusing for the conductor. She felt there were too many actions in preparation for starting the conducting. As a result, a change was made before the first performance at Dokkhuset in which the volume control and metronome were to be manually activated, thereby eliminating the need to make the OK sign and press the metronome button. That way, she only needed to press the third button once to start the piece.
That was a last-minute compromise and needed fine-tuning before the next performance. The tight synchronization expected between the played instrumental sound and the live electronic sound suffered since her conducting beat was significantly faster than the manually set metronome for the DAW. Since there are markers in the written score (marked with button sign 4) that assist the conductor in synchronizing the score and electronics, the performance never veered far off course. Nevertheless, the performance was negatively affected.
How to Start Performing – Instruction Videos
Links are provided below for seven short instruction videos that were made to illustrate the processes described in the section above. They are based on an earlier version of the musical score and are meant to give insight into the complications involved in starting the performance. Because they focus on the opening measures, the video clips give a good overview of the conductor’s job and should improve the reader’s understanding of the functionality of the ConDiS system.
The reader should be aware that the musical score used in these videos is from an older version of Kuuki no Sukima and therefore looks slightly different than the final version. The main difference is that in the newer version less information is provided for the conductor.
Instructions for the conductor:
Video example #6: http://caveproduct.com/videos/KnS_Cond_ins_part….mp4
A closer look at the instructions:
Video example #7: http://caveproduct.com/videos/KnS_Cond_ins_part….mp4
After the conductor has activated the volume control, she can adjust the volume value of the electronic sound by moving her arm up and/or down.
Moving arm up and down, opening hand for control deactivation:
Video example #8: http://caveproduct.com/videos/KnS_Cond_ins_part….mp4
There are several other extra things the conductor needs to do before starting the piece. She has to set the metronome for the piece, which in this case is metronome 48. To do so, she needs to press the index finger button four times in the tempo of the written metronome.
As with the videos above, the instructional video below uses an old version of the musical score. Therefore the narrative description provided above and the musical score do not always coincide.
Setting the metronome:
Video example #9: http://caveproduct.com/videos/KnS_Cond_ins_part….mp4
After setting the metronome, the conductor has to press the 3rdbutton to tell the computer that she has set the metronome.
The following video demonstrates in more detail what the conductor has to do in the opening measures of Kuuki no Sukima.
Opening measures of Kuuki no Sukima at the Dokkhuset concert:
Video example #10: http://caveproduct.com/videos/KnS_ConBeg.mp4
The aim of the project, however, is to create a system simple enough for conductors to use as a “natural” extension of their conducting tradition. Therefore, simplification was needed before the next scheduled concert, The Nordic Tour.
Kuuki no Sukima, the Nordic Tour Version
Pre-performance Preparation
The following pre-performance preparation needs to occur before the conductor enters the stage (this remains unchanged from the Dokkhuset performance):
- Turn the sensor on by clicking the on/off button attached to the sensor.
- Press the 5thbutton two times to move the play-head back to the beginning and stop playing. (When turned on the network sends a start signal to the DAW.)
- The conductor has to press the 3rdbutton once to stop the rewind function of button five.
- Select the OSC network on the laptop.
- Activate the calibration toggle on the ConDiS interface. Open and close hand three times for finger recognition. Deactivate the calibration toggle.
The performers and the audience do not see any of this preparation since these actions are all done before the conductor enters the stage. Nevertheless they are a hassle and stressful for the conductor.
Changes were made from the first performance:
 Activating the volume control unit is no longer necessary since there are no other units to activate after the pan and effect control were left out.
Figure 59 shows the opening page of the second version of Kuuki no Sukima – Between the Air. Instructions are written out to indicate what the conductor needs to do in the opening measures of the piece.
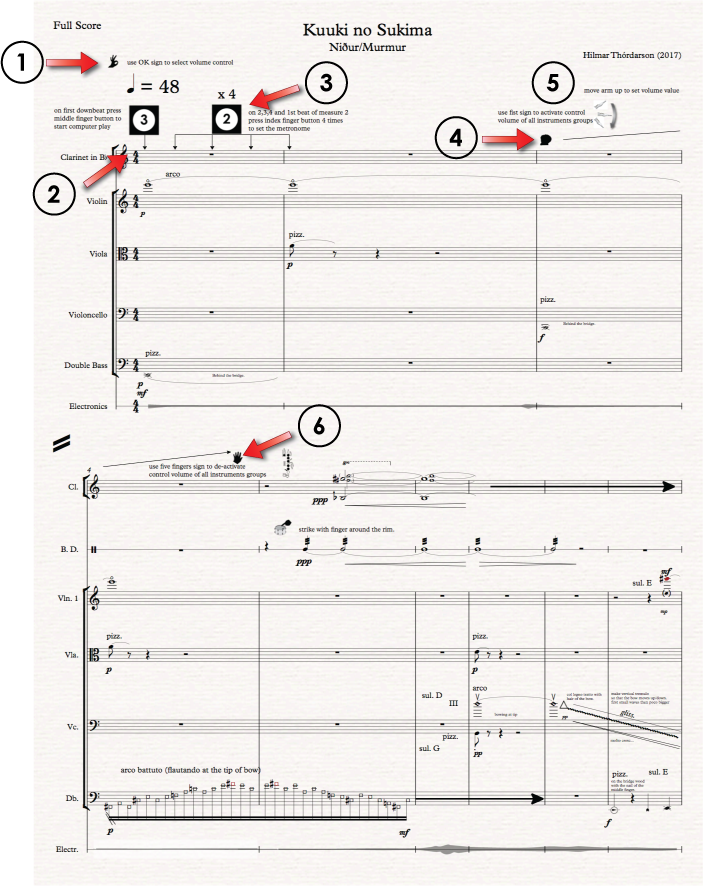
Figure 59. The opening page of Kuuki no Sukima 1st movement. Second version of the composition as performed during the Nordic Tour.
The order of tasks to start the performance was changed:
- The conductor gives a sign to start playing by clicking the 3rdbutton on the first downbeat, not the upbeat as in the earlier performance.
This solution worked very well and produced no problems in ensuring the performance is synchronized right at the beginning.
- The conductor gives the metronome speed after starting the performance instead of before, as in the earlier performance.
This change worked out very well since it is a natural extension to her conducting technique.
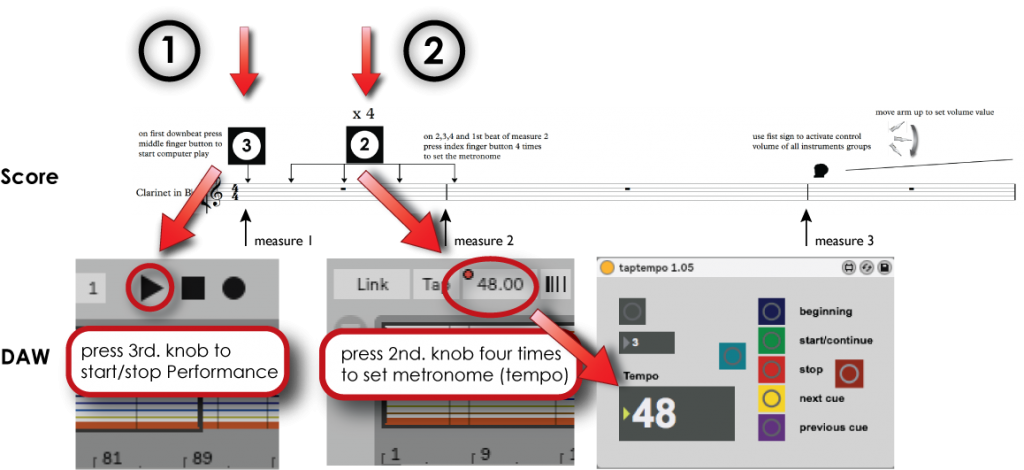
Figure 60. Press 3rdbutton to start performance. Press 2ndbutton to set metronome (tempo 48). This illustrates the relationship between the musical score and the DAW.
- The conductor closes her fist and raises the electronic volume level in measure three instead of doing it at the very beginning, as she did in the first version.
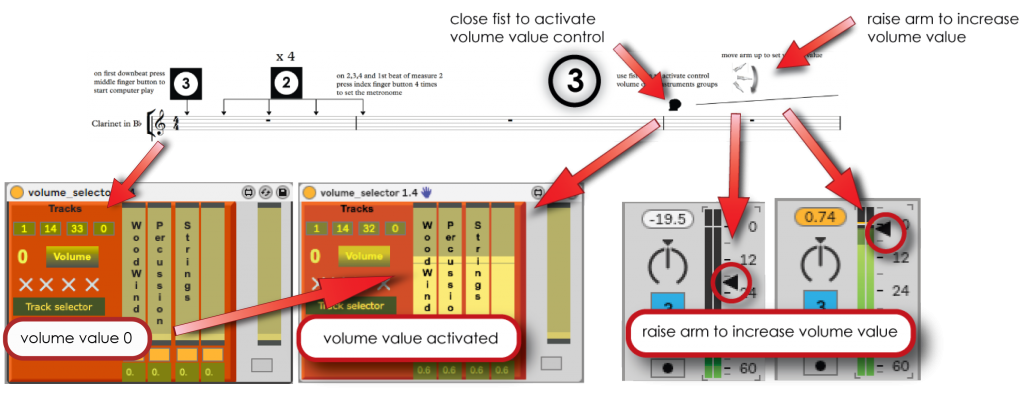
Figure 61. Start performance, set metronome, adjust volume.
- When the electronic volume value has been set, the conductor deactivates her control by opening up her fist as shown in the next example:
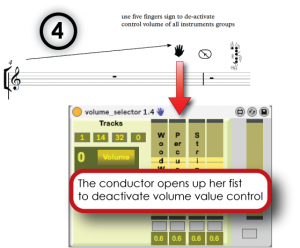
Figure 62. Control of volume value deactivated
The computer recognized the close/open fist gesture faultlessly, and there was an audible increase in volume when the conductor raised her arm.
This solution worked very well since it:
- gave the conductor more confidence in adjusting the electronic volume;
- gave the opening a bit more breathing room;
- illustrated the intended use of ConDiS in a clear way; and
- resulted in a more graceful opening aesthetically speaking.
Issue: Volume Value Not Clear
Conversations with Halldis after the concert in Harpa, however, revealed that she was not entirely confident with respect to knowing how much she had increased the volume. She found it especially uncomfortable not knowing how much headroom was left, i.e., whether she could increase the volume even further. This is easier to understand with reference to the interface:
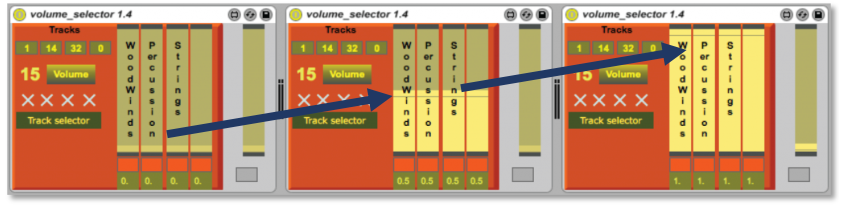 Figure 63. Volume selecting interface. 0 = no volume; 0.5 = half the min/max volume value; 1 = max volume value
The first volume selector (at the left) shows the volume value at zero points; the next one shows the volume value at half point, 0.5; and the last one shows the volume value at its maximum point of 1.0.
I suggested placing this visual information on the stand next to the score with use of an iPad or iPhone. After giving it some thought, the conductor decided that while this was a good idea in theory, it might prove too distracting for her ability to concentrate on conducting the score.
With the experience we gained during the Nordic Tour, we discovered that it was essential to adjust monitoring so she could hear the electronics and the ensemble equally clearly. That way she could rely on her hearing and would not need to see the volume value interface.
Kuuki no Sukima– Sonic Analyses
In this section I will focus on the sonic part of the concert, how the sound of the instruments interacts with the electronic sound effects of the DAW, to showcase the relationship between the written notation and sonic output. I will explain how I use traditional notation in conjunction with the “traditional” graphical interface of music software applications. Attention will also be paid to the feature commonly called “automation,” which refers to control whose value changes over the course of a timeline that is automated.
Sonic Analyses
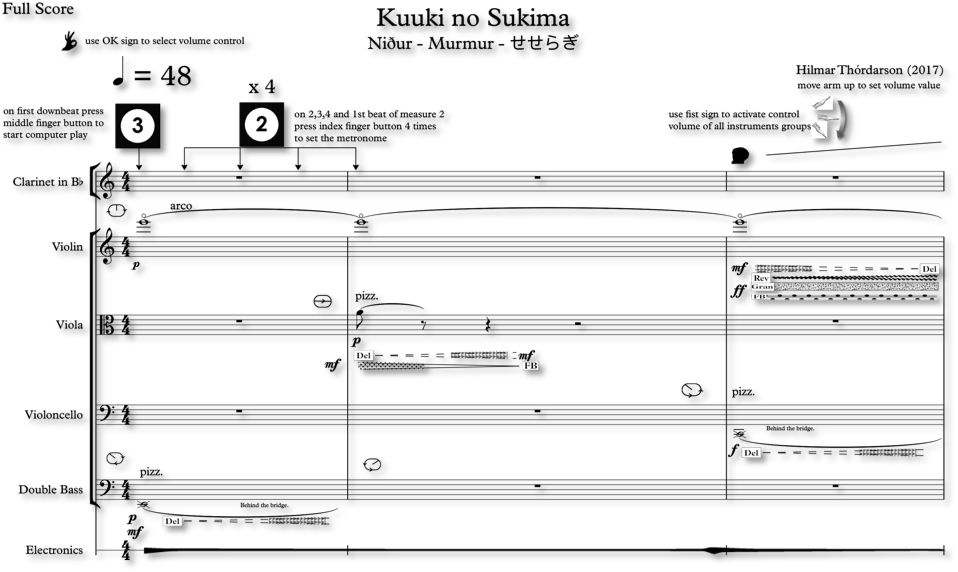 Figure 64 shows the opening measures of Kuuki no Sukima.
Figure 64. The opening measures of Kuuki no Sukima. The first effects are not audible, hence an electronic volume level of zero.
Figure 65 shows the revised version of the opening measures of Kuuki no Sukima.
Figure 65. Revised version of Kuuki no Sukima with electronic effects removed.
The opening measures of Kuuki no Sukima:
Audio example #1:http://caveproduct.com/audio/Harp_1st.m.1-5.2.wav
In the opening measures there is no use of electronics to interfere with the clear, dry sound of the instruments until the conductor activates the volume control by closing her fist and then raises her arm. At that point, the beginning of measure three, the conductor increases the volume of the electronic sounds from none to the desired level. This beginning is a slight change from the original concept, in which the electronics were supposed to be active from the beginning. Why did I make these changes? As mentioned above, this revision simplified the actions the conductor had to perform in preparation for the performance. This way the conductor did not have to raise her arm before starting the performance to a volume of no responding sound. It is undoubtedly possible to have the volume adjusted beforehand in the DAW, but that solution would not have resolved the issue to my artistic satisfaction. Aesthetically the solution of having her raise her arm later in the piece worked out to produce a stronger beginning. It gave the composition a more dramatic opening, with the electronics entering with the visual and sonic effects of the conductor raising her arm.
Graphical Notation of the Digital Signal Processing (electronic sound)
Figure 66 shows the relationship between the notated score and the DAW. This selection focuses on the violin part, the sound of which starts to change in the third measure or as soon as the conductor raises her hand, thereby increasing the volume of the DSP or the electronic sound.
A closer look at the score and the electronic score will illustrate how these aspects are connected or related.
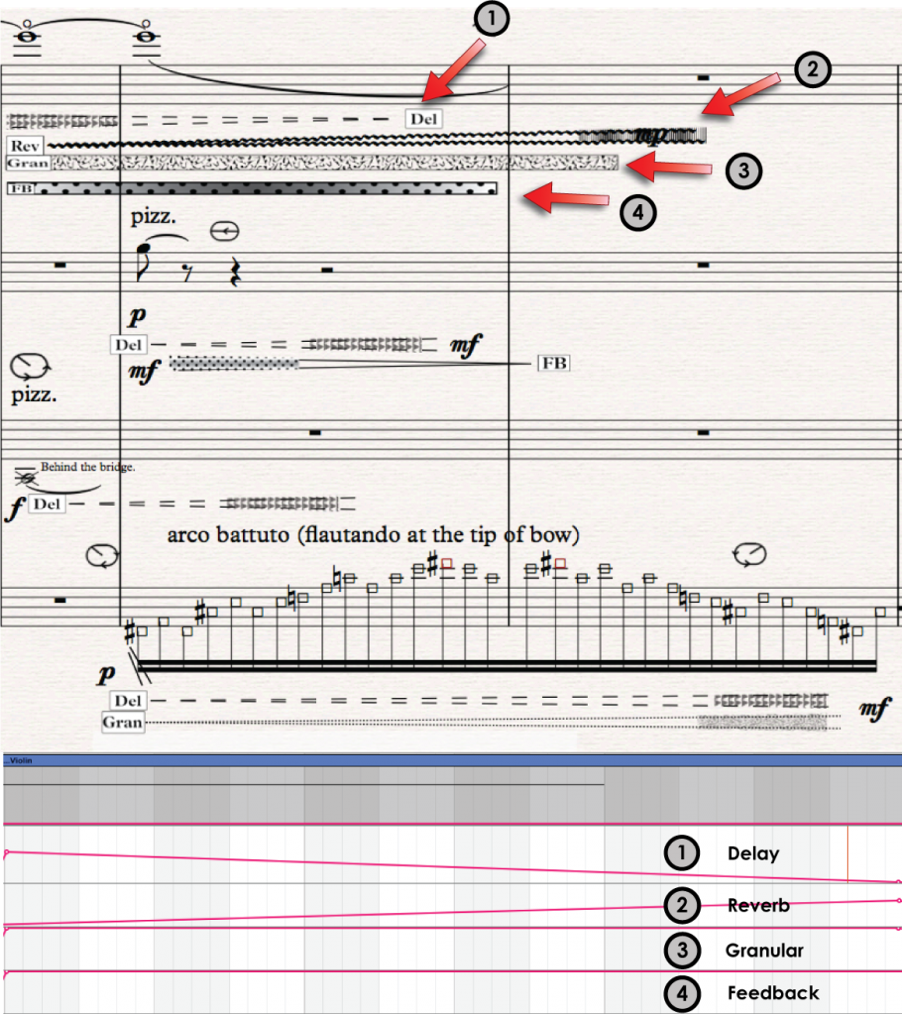
Figure 66. Kuuki no Sukima measures 3-6. The connection between notated score and the graphical interface of the DAW.
The score and the graphical notation of the electronic effects that are added to the high opening note of the violin (E) reveal several effects with respect to the volume:
- Delay with diminuendo (decreasing volume) from approximately mf to silence.
- Reverb fades in with increasing volume to approximately mp(relatively little reverb).
- Granulation starts with ff(very strong) and stays unchanged.
- Feedback starts with ff(very strong) and stays unchanged.
I consider it very important to be able to notate the electronic sounds in the score in synchronization with the graphical interface of the DAW. That way, when composing, I can write on the manuscript paper both the instrumental sonic idea (notes) and the electronic extensions of the DAW (effects). Having been trained to read musical scores, this helps me to hear and feel the music by looking at the score. In the example above, I can easily imagine how the sound of the violin gradually changes with decreasing delay and increasing reverb, granulation, and feedback. I can hear how the electronic effect gradually comes in with the conductor lifting her arm, although I can see that this will never be too strong given the mp volume sign written in the score.
The following example illustrates the opening eleven measures of Kuuki no Sukimaand shows the close relationship among the score, the DAW, and the conductor’s gestures.
Kuuki no Sukimameasures 1 – 11:
Video example #11: http://caveproduct.com/videos/H_KnS_1st_m_1-11.mp4
Measures 11 – 14
In measure 11 there is a general pause where the conductor stops the playback of the electronics by pressing the 3rdbutton on the glove. After the pause, the conductor continues by pressing the 4thbutton, which jumps the playback-head of the DAW precisely to the beginning of measure 12. That synchronizes the DAW and the notated score so that the bass drum and piano duo are in sync with the written effects of the electronics.
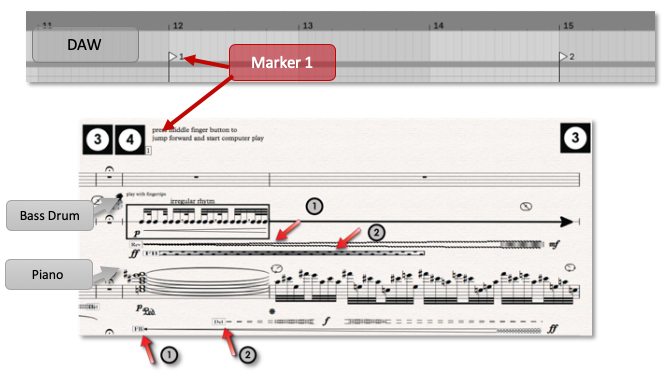
Figure 67. Kuuki no Sukima measures 11-14. Percussion and piano entrance showing first synchronization point.
As shown in the figure above, the bass drum comes in with increased reverb and strong feedback effect while the piano has increased feedback as well as increased —> decreased delay.
Bass Drum
- Reverb crescendo to mf (mezzoforte) medium loud.
- Feedback with unchanged ff (fortissimo) strong effect.
Piano
- Delay crescendo to f (forte) —> diminuendo to zero.
- Feedback from zero to ff (fortissimo/very strong).
The next illustration is of the automation for the same measures as written in the DAW.
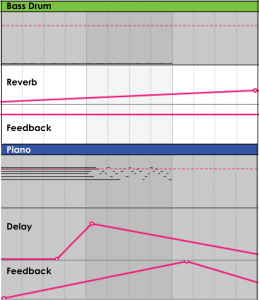
Figure 68. The automation window of the DAW.
The above figure shows the automation for the electronics that should be in precise synchronization with the written score. It means that when the bass drum starts playing its rhythm pattern, there is an increasing reverb coming in and very strong feedback. At the same time, the piano plays a chord that should, at the beginning, have very little electronics, with increasing delay and feedback as the chord dissolves in single notes.
This is exactly what I was aiming for with the development of ConDiS. I sought to create a tool that would allow the conductor to conduct with all the expressions (rubato, etc.) necessary in her interpretation of the music while also synchronizing the score and DAW.
The following example, taken from the closing concert performance of Kuuki no Sukima, shows how the conductor stops the DAW in measure 11 (pressing button 3) and continues in perfect synchronization with the score in measure 12 (pressing button 4). It also provides a very good example of how the conductor decides to increase the electronics volume level by raising her arm even when this is not written in the score. After she has adjusted the level, she presses the third button in measure 14 to stop the DAW. Then she waits until the sound is about to fade out before synchronizing and starting the flute entrance in measure 15.
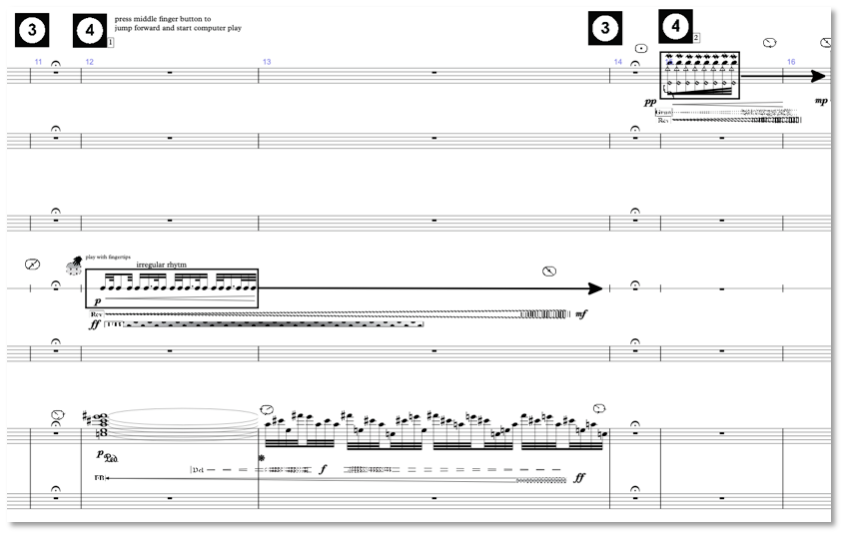
Figure 69. Measures 11-16, with percussion and piano entrance in measure 12 and flute entrance in measure 15.
Bass drum and piano duo in measures 11 – 14:
Video example #12: http://caveproduct.com/videos/R_1st.m.11-16.mp4
Measures 37 – 49
After the fermata in measure 36, the score and the DAW are synchronized before the flute comes in. Here we can easily hear the electronic effects of delay and reverb as the flute continues to play (and sing). The electronic effects become even more audible as the strings and the clarinet enter with an increasing delay, reverb, and granulation. This part is one of my favorites since it sounds very close to the sonority that I had in mind and it adds a very elaborate sonic cloud to the chord progression.
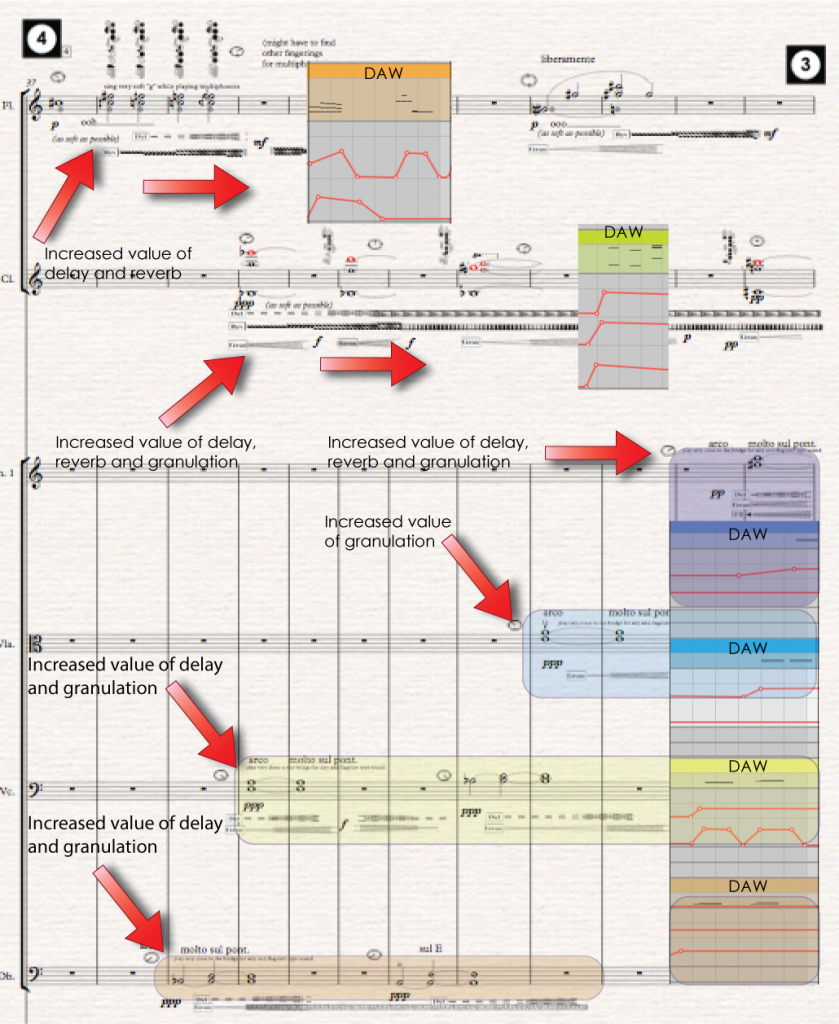
Figure 70. Kuuki no Sukima measures 37 – 49, showing various electronic Fx hairpins in conjunction with the DAW.
Figure 70 shows measures 37 – 49 and the connection of the score to the DAW. As can be seen, the volume of the electronic effects increases significantly after the multiphonics begin. The effect can be heard clearly in the video recordings below.
Volume of Electronic Effects:
Video example #13:
http://caveproduct.com/videos/R_1st.m.37-49.mp4
http://caveproduct.com/videos/Cph_M4.mp4
It is particularly interesting that the electronic sounds are very clear even though the volume of the instruments, which is the power source for the electronic sounds, is very weak. The main reason is that the effects are very open or strong f(about 85%). It is therefore not necessary to increase electronic volume if the acoustics are soft.
The following is an illustrated video example that shows the opening measures
(measures 1 – 23) of Kuuki no Sukima:
Video example #14: https://www.youtube.com/watch?v=NwxfjLoe9Ek&t=74s
Reflections
The synchronization solution, whereby markers are placed in the DAW that aligns with the button sign on the score, was the simplest and most reliable solution that I could find. It is far from perfect since it relies entirely on the conductor not only remembering to press the button but to press the right button—in this case button four—and to press it correctly. For this reason, a backup or emergency setup was placed in the DAW graphical interface so that an additional party (the composer) could “correct” the synchronization function if something went wrong. Most of the mistakes that did happen occurred during the first concert, but they became fewer in number as the conductor gained more experience. The last two concerts in Schæffergården and Rockheim witnessed none of the button-pressing mistakes that happened in earlier performances. It should be acknowledged, however, that I would have liked to have found—and continue to hope to find—a better solution to this because one of my primary aims was and still is to completely eliminate the “middleman.”
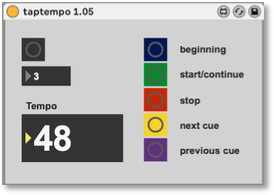
Figure 71 shows the security buttons of the DAW.
Figure 71. The synchronization unit of the ConDiS system
It should also be noted that the synchronization unit of the ConDiS system turned out to be very useful during rehearsals as it allows the conductor to manually jump forward or backward between the markers in the DAW. Thus, if the conductor needed to play from a given marker in the score, she could align it to the marker in the DAW. This saved a lot of time and frustration as this kind of flexibility is a key factor in keeping the flow that is necessary during rehearsals.
The Conductor’s Relationship to the Conducting Tool
There are a few instances in the score where an arm movement is written to indicate live variations in the instrumental and electronic mix. The following section focuses on the conductor’s use of her arm to control the overall volume of the electronics. Attention is paid to how she follows the written arm movement indications while adding her own sense of volume control based on her musical sensitivity.
The Conductor following Electronic Volume Control instructions
1stMovement
During the first movement of Kuuki no Sukima there are four events where the conductor has written instructions to activate volume control. Two of these volume control events occur at logical points when the conductor needs to raise and lover the electronic volume: at the beginning and the end of the movement. The other two have been inserted at places where I felt it necessary for the conductor to control the volume.
Figure 72 shows the four places in the first movement of Kuuki no Sukimawhere volume control is written in the score.
Example 1
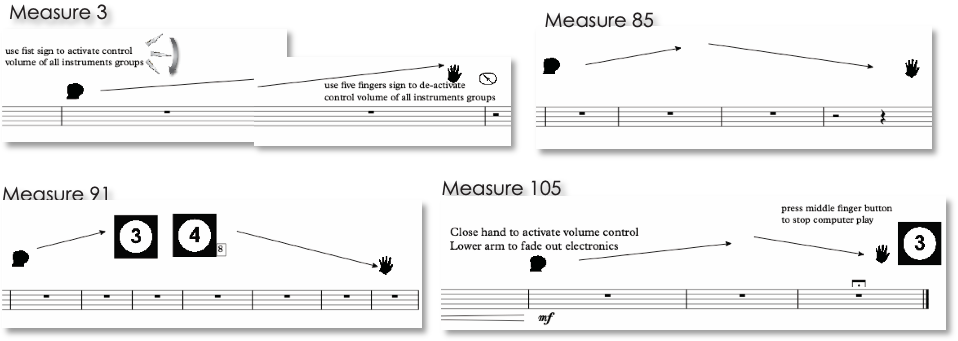
Figure 72. The four-volume activation points written in the score of the first movement of Kuuki no Sukima
The accompanying video is a collage of these four written volume control spots. They were all recorded at the ConDiS closing concert in Rockheim and show how the conductor follows the written instructions. As can be seen in the accompanying video, the conductor follows the given instructions entirely. This is exactly what took place at all six concerts. This provides definitive proof that writing instructions for volume control is not only feasible, but also reliable.
The Conductor following Electronic Volume Control instructions:
Video example #15:http://caveproduct.com/videos/R_Vol.ctrl_cue.mp4
Even more interesting is an analysis of when the conductor activates volume control when it has not been written in the score. These occasions of instant decisions being made in the middle of a performance reveal the crucial benefits of putting this form of control into the hands of the conductor. These are the very moments, after all, that are so important in performing music. And it is these moments that provide the underlying impetus behind creating ConDiS: to put all the conducting into the hands of the conductor. These moments reinforce my conviction that the conductor is best suited to control all elements of the music performance. To demonstrate this, I will refer to examples from several places in Kuuki no Sukimaand compare various instances of its performance. These performance examples are taken from the concerts in Harpa Concert House in Reykjavik, Schæffergården in Copenhagen, and Rockheim in Trondheim.
The Conductor controlling Electronic Volume Control
Example 2
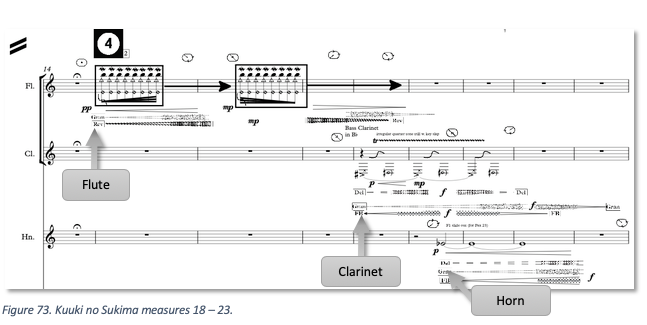
Figure 73. Kuuki no Sukima measures 18 – 23.
After the flute mordent notes, the bass clarinet enters with a combination of irregular slap and trill and soon thereafter the horn plays a note that has a crescendo from p(soft) to f (loud). At the same time, the conductor decides to give the horn a bit more electronic support, as can be heard in the video clip below.
Measures 18 – 23. Video example #16 – 18:
Harpa: http://caveproduct.com/videos/H_1st.m.15-23.mp4
Schæffergården:http://caveproduct.com/videos/S_1st.m15-23.mp4
Rockheim: http://caveproduct.com/videos/R_1st.m.18-23.mp4
The electronic effect is easily audible as the conductor raises her hand, providing a clear indication that she is affecting the overall value of the electronic sound. Since the conductor opens her hand when her arm is in the uppermost natural position, the electronic value stays at a high value until she makes the next adjustment. Though there are slight variations among the performances, the conductor always activates the electronic volume control in roughly the same place. This demonstrates that the conductor has studied the whole composition, the instrumental score, and the electronics, and is adding her own interpretation to the performance.
Example 3
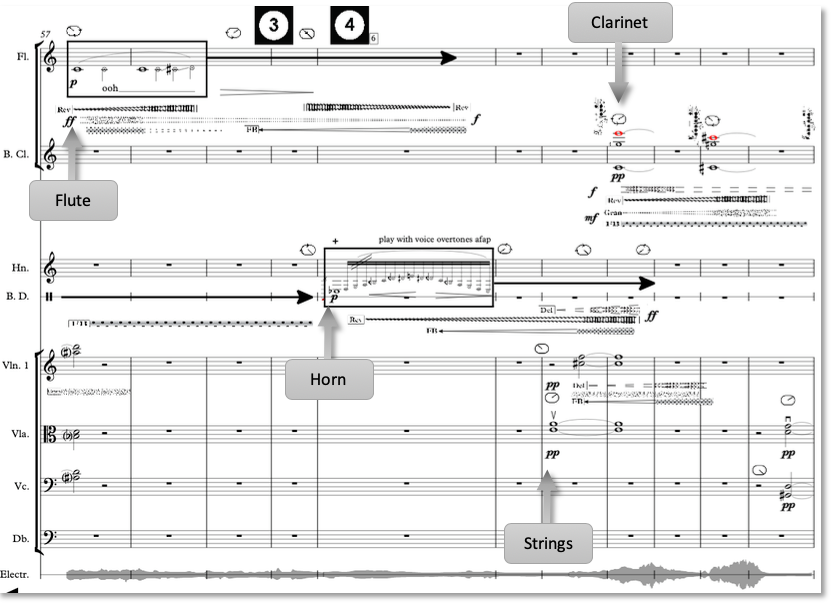
Figure 74. Kuuki no Sukima measures 57 – 68.
Video example #19 – 21: Measures 63 – 68.
Harpa:http://caveproduct.com/videos/H_1st.m.57-68.mp4
Schæffergården: http://caveproduct.com/videos/S_1st.m.57-68.mp4
Rockheim: http://caveproduct.com/videos/R_1st.m.57-68.mp4
Example 3 shows another instance where the conductor activates the volume control at a similar place in the music (score). This time she handles the control quite differently between performances. At Harpa she raises the volume value close to where the strings enter, while at Schæffergården she decides to lower the electronic sound of the strings before the clarinet enters. After the clarinet has entered the conductor plays with the capabilities of ConDiS by increasing and decreasing the electronic volume or, in musical terms, the conductor makes a crescendo and diminuendo at the beginning and end of each sustained multiphonics of the clarinet. This playfulness is even more noticeable in the Rockheim performance, where she brings the volume up and down in a very musical and playful way. It is clear that at the Rockheim performance, which was the last performance, the conductor has become so familiar with her “extended” conducting job that her conducting gestures are much more relaxed or what I would prefer to call “poetic.”
These measures provide a perfect example of very positive and musical use of ConDiS technology. Here the conductor is molding the sonority of the instruments and electronics in a slightly different way, using her musical talent to create a live “conversation” that would be impossible without the live interactivity that is available through ConDiS.
2ndMovement
The second movement has more complexity and musical action. This means there is less time for the conductor to adjust the ConDiS system. It is deliberately composed that way to experiment and discover where the boundaries of conducting information lie.
Example 4
Example 4 comes from measures 16 – 21, where the left-hand pizzicato motive from measure 11 is repeated. Again, nothing is written in the score indicating that the conductor should adjust the electronic volume value. It is therefore an exercise of her own musical judgment to add more electronics to the pizzicato. By doing so, the conductor brings out slightly variated repetition, producing an interesting effect and making the repetition much more effective.
Figure 75. Kuuki no Sukima 2ndmovement. Measures 16 -21
The conductor adds electronic volume to the pizzicato motive of the double bass:
Video example #22 – 24: Measures 14 – 21.
http://caveproduct.com/videos/H_2nd.m.14-21.mp4
http://caveproduct.com/videos/R_2nd.m.14-21.mp4
http://caveproduct.com/videos/S_2nd.m.14-21.mp4
Example 5
Another example of the conductor using the ConDiS to insert spontaneous volume control occurs in measure 46. When the horn enters (grey arrow), the conductor immediately brings down the volume value and keeps it low until measure 49. Then, as the cello enters with its pizzicato, a knock-on body, vertical bowing tremolo and glissando (grey arrow), she increases the volume. By doing so, the conductor makes sure that the sonic effect of the cello is evident before adding the electronics.
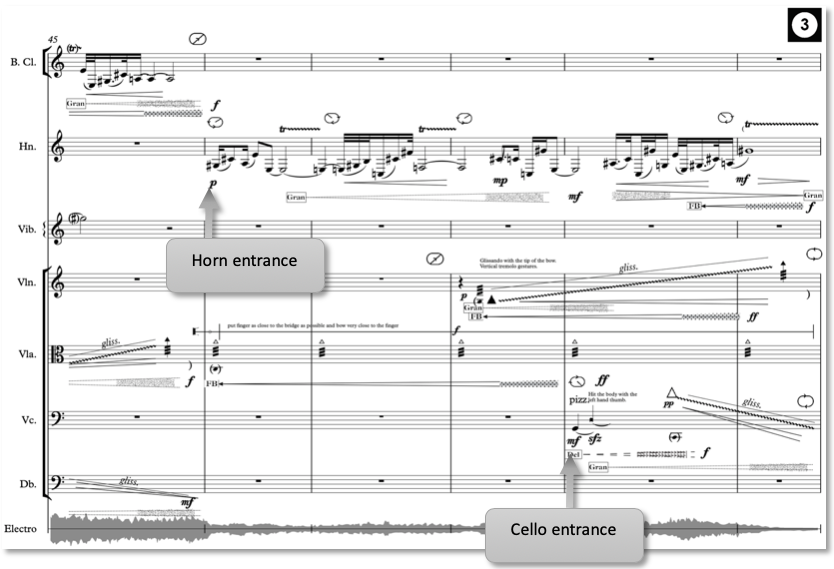
Figure 76. Kuuki no Sukima 2ndmovement. Measures 45 – 55.
Once again, the conductor uses musical intuition in keeping the horn electronic levels all the way down to emphasize the cello electronics with the pizzicato, knock, and glissando sounds.
Video example #25 – 27: Measures 45 – 55:
http://caveproduct.com/videos/H_2nd.m.45-55.mp4
http://caveproduct.com/videos/R_2nd.m.45-55.mp4
http://caveproduct.com/videos/S_2nd.m.45-55.mp4
3rdMovement
Example 6
The following example, which shows measures 54-63, is a good illustration of the use of the ConDiS system, as the conductor needs to stop the DAW and synchronize and then set a new tempo (metronome 92). She immediately decides to activate a volume value control to reduce electronic sounds, though this is not written in the score.
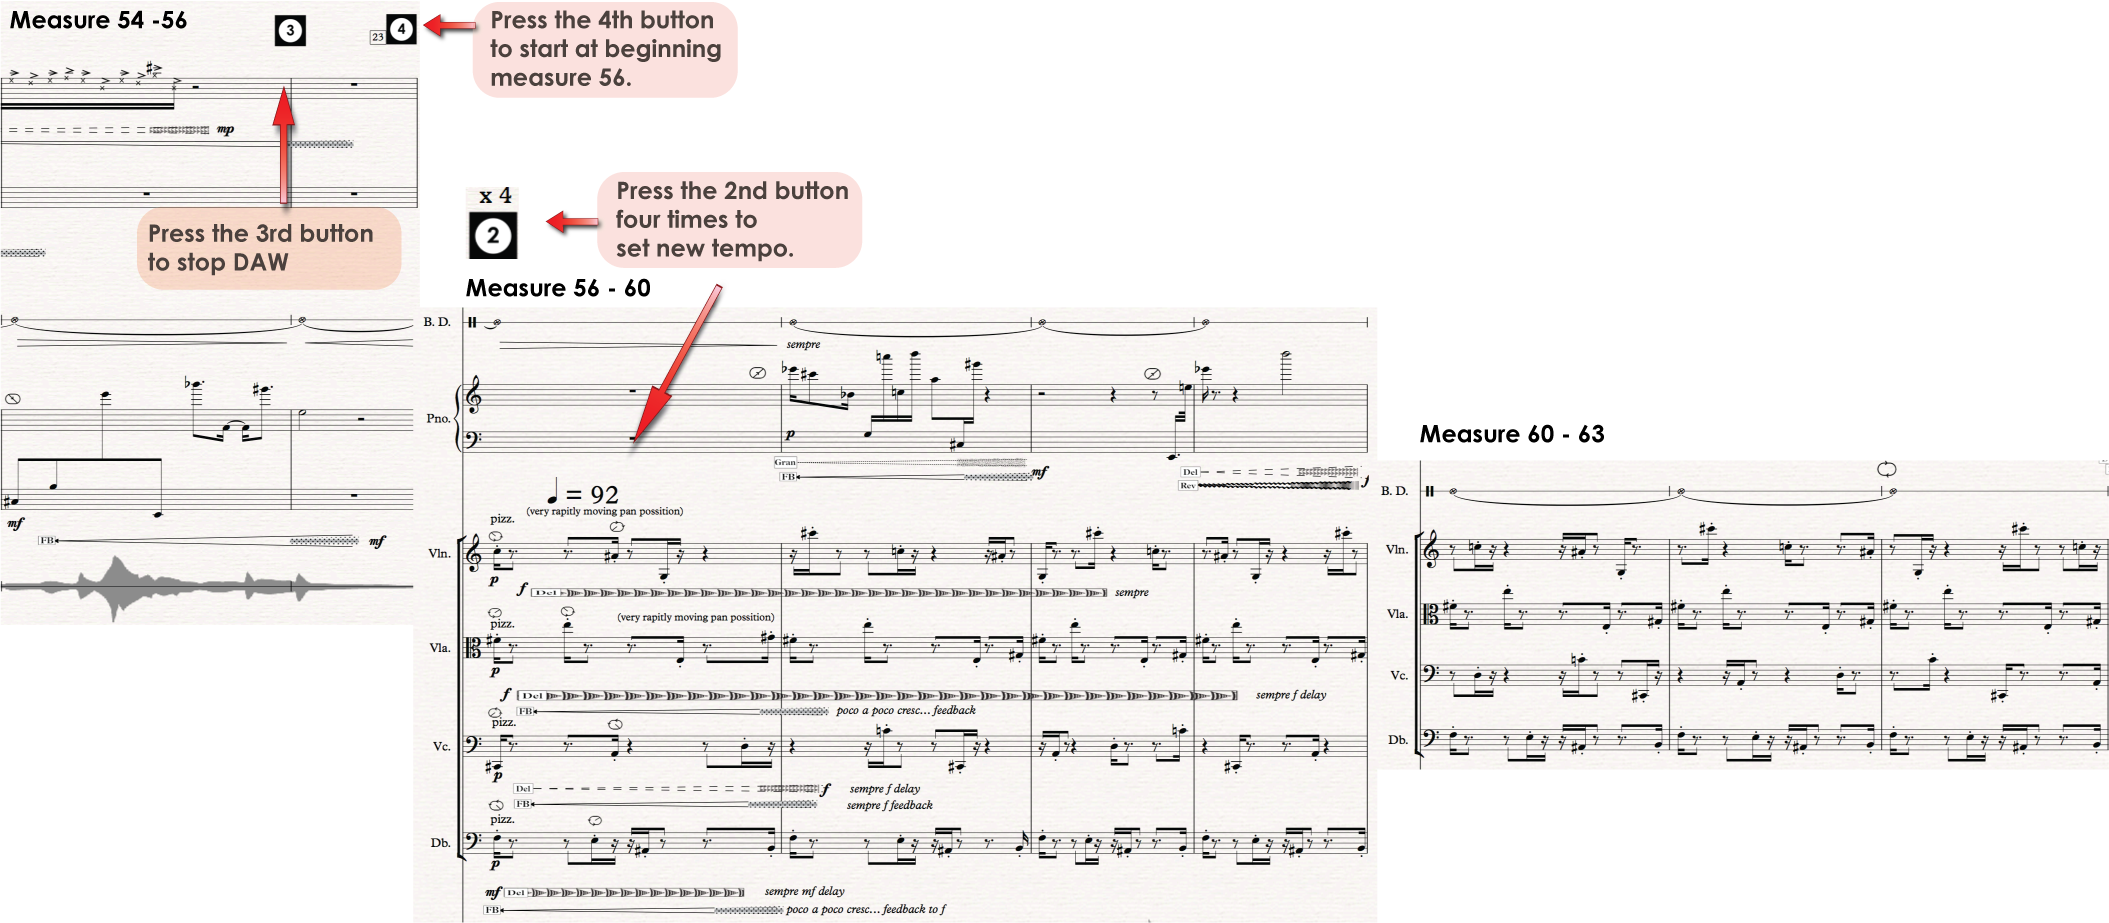
Figure 77. Kuuki no Sukima 3rdmovement. Measures 54 – 63.
The accompanying video is of the performance of these measures. It shows clearly how the conductor, without visible difficulties, changes tempo from being around metronome ![]() = 64 to
= 64 to ![]() = 92. At the same time, she reduces the volume value of the electronics, probably because she has found the echo effects following the pizzicato (plucked strings) to be too loud. She then relatively quickly decides to increase the volume so that the echo comes in. It is a perfect example of how the conductor herself determines the balance between the sound and electronics. Her intention is to keep the echo effect strong at the beginning of this pizzicato section. The conductor’s interpretation is excellent and gives the music more life. Again it comes down to the conductor’s role in the music performance. Even though it is generally accepted that the conductor’s job is to put themselves into the mind of the composer and interpret the music from that starting point, it is inevitable that the conductor stamps her own mark on the performance. The fact that the conductor puts her character into the composition is very important to me as a composer. It is in this way that the music comes to life, from being black dots on the manuscript page to a sea of sounds, tones, and chords.
= 92. At the same time, she reduces the volume value of the electronics, probably because she has found the echo effects following the pizzicato (plucked strings) to be too loud. She then relatively quickly decides to increase the volume so that the echo comes in. It is a perfect example of how the conductor herself determines the balance between the sound and electronics. Her intention is to keep the echo effect strong at the beginning of this pizzicato section. The conductor’s interpretation is excellent and gives the music more life. Again it comes down to the conductor’s role in the music performance. Even though it is generally accepted that the conductor’s job is to put themselves into the mind of the composer and interpret the music from that starting point, it is inevitable that the conductor stamps her own mark on the performance. The fact that the conductor puts her character into the composition is very important to me as a composer. It is in this way that the music comes to life, from being black dots on the manuscript page to a sea of sounds, tones, and chords.
Video example #28 – 30: Measures 54 – 64.
Harpa: http://caveproduct.com/videos/H_3rd.m.56-64.mp4
Schæffergården: http://caveproduct.com/videos/S_3rd.m.56-64.mp4
Rockheim: http://caveproduct.com/videos/R_3rd.m.56-64.mp4
Reflections Based on an Interview with Halldis Rønning
Having the opportunity to work with conductor Halldis Rønning was an experience to treasure. From the very first moment I could feel her genuine interest in and commitment to the ConDiS project. It is not easy to work closely with a composer in the process of interpreting a new composition. And that is to say nothing about a composer who has added a digital glove to expand the conductor’s field of work. Halldis Rønning showed admirable confidence, was positive all the time, and never questioned the musical usefulness of this experimental project. As was stated in the interview I conducted with her soon after the Nordic Tour, it became clear that she became more and more confident using the ConDiS technology after each concert, meaning she was able to play more with her musical and extended conducting abilities. Her only source of anxiety was receiving an overload of feedback through the speaker system, which occurred several times in the practice process. In the preliminary interview, Halldis suggested making slight changes to the design of the conducting glove to make it easier to turn pages while conducting. This was absolutely an oversight on my part because I am left-handed and usually use my right hand to turn pages.
The Fragility of the ConDiS System During Performance
As clearly stated in the interview with Halldis were some difficulties using the ConDiS during the performances. The primary problem, especially during the early concerts, was that she did not sense much sonic response when using the conducting glove. She had difficulties in knowing how much volume to add and even how much the electronic volume would respond to her gesture. A feedback problem during rehearsals and the first performance at the Dokkhuset in November caused her to become nervous and cautious about using the ConDiS system’s volume function. This fear about getting a feedback loop into the system also seems to have affected the performers, whose responses to my questioning[1]indicate that their knowing that conducting the electronics could go wrong had negatively affected their concentration.
Although for me the ConDiS conducting system was a successful outcome of the research project, I am aware that there are many things that can be improved. Mixed music performance of this kind, where there is a live real-time sound processing, is fragile in its nature. Feedback is a problem that increases proportionally with the size of the group of performers. On the other hand, the fact that the feedback “problem” disappeared at later stages was a good sign. It showed that additional experience helped to produce a better solution with respect to the microphone and speaker setup. It proved that as the conductor accumulated more experience she got more used to the functioning of the ConDiS and was therefore able to keep the feedback under control.
Volume Level “Headroom”
Steering the overall volume of the electronic sounds is a complicated task and still a problem. The reason is that the conductor has a very little volume to control if and when the instruments are playing a soft passage. This is due to the fact that the source for all of the electronic sounds is the performing instruments themselves. If the instruments play softly, a very low sound level feeds into the audio system, producing a very soft electronic response. When the conductor tries to raise the volume level of a very soft sound source, there is a very subtle change that can lead to feedback. If, on the other hand, the volume level of the instruments is very loud, the conductor has much more “headroom,” meaning the conductor can change the volume level of the electronics much more drastically. To put this into more musical terms: If the instruments are playing very softly or ppp, the audio level of the electronics can vary from silence (volume 0 or 0%) to max p (30%); if the instruments are playing very loud fff, the audio level of the electronics can vary from silence (0%) to fff (100%). This difference in response was a bit problematic for the conductor and made it more difficult for her to get a “feel” for the volume control function.
While composing Kuuki no Sukima I was fully aware that writing a very soft-sounding piece would cause more problems than writing a composition with a louder sonic level. But that was part of the research process: I really wanted to create a composition where the sounds were soft and one would have to listen carefully to each sound to hear the slightest change. Perhaps it was a failure on my part not to have written a composition that included more volume changes or at least one moment with more loudness to demonstrate the use of ConDiS. Perhaps I should have written a composition giving the conductor more time to explore and play with the volume control. What would happen if there were a section where the strings play long sustained notes and the conductor can play with the volume or mix between the instrumental and electronic sounds? What would happen with a composition in which…? These questions can only be answered with new compositions.
I later realized that there are a number of ways to solve this “headroom”—or dynamic—problem. An altered DSP chain placing dynamic range compressions such as a limiter or compressor, for example, would make it possible to increase the electronic intensity of the incoming signal. These experiments are yet to come and will undoubtedly be a part of future projects.
One important factor in the conductor being able to control the overall volume is how evenly she hears the acoustic and electronic sounds. And this is a direct consequence of the stage setup, namely the microphone and loudspeaker locations. At the Harpa concert the loudspeakers were located in front of the ensemble, so neither the conductor nor the performers could clearly hear the electronics (see Appendix ???). Cellist MarianneBaudouin Lie wrote in her answer to the survey question of whether a different positioning of the ensemble would have made a difference, with reference to the location of the ensemble behind the front speakers at the Harpa concert:
Here I could hardly hear the electronics and it felt a bit like not being part of the work, like just being “the ensemble” and not inside the music. I was also uncertain as to whether the audience were hearing enough electronics.
From an aesthetic point of view, this problem, which is practical in part and technical in part, did affect the overall artistic outcome of the performances. It caused variations in the sonic outcome that were too drastically different from one performance to another.
This inability to hear the electronics at Harpa caused the ensemble to play louder and the conductor to use more volume control. At the concert in Schæffergården, the front loudspeakers were located behind the ensemble and the back speakers behind the audience. That resulted in a much softer performance, where the conductor kept the overall volume of the electronics much quieter. At the closing concert in Rockheim, monitors were placed behind the stage while the main loudspeakers were placed at front of the stage and the back speakers to the rear of the audience (see Appendix ???). This loudspeaker setup proved to be the most satisfactory in the attempts to produce a complete mix of the overall sound for all parties: the performers, the conductor, and the audience.
Reflections from the Performers
Shortly after the Nordic Tour, a questionnaire was sent to the members of the Sinfonietta. The following are my reflections on answers submitted by three members of the Trondheim Sinfonietta: the French hornist Peter Hatfield, cellist Marianne Baudouin Lie, and flutist Trine Knutsen.
- What is your opinion about the idea of expanding the conductor role by conducting the electronic sounds rather than a sound engineer? Is there an artistic gain?
They shared the belief that the idea of expanding the conductor’s role is a positive development. Marianne felt it made it more a part of the performance, adding extra tension to the electronics, regardless of whether everything works. Peter mentioned the possibility that the conductor (any conductor) wearing the glove “would become more creative with it,” while Trine pointed out that it made the performance unique from time to time.
Their answers reinforce my view that ConDiS is a step in the right direction. The fact that musicians experience each performance differently, that they feel the electronics to be more a part of the whole, and that they paid more attention to the electronics is positive. This completely corresponds to the ConDiS conceptual charge to expand the possibilities of live concert performances. The project aimed to open the door to new possibilities for inspiring creativity that is unique to the performing artist on stage.
- With the conductor being able to control the electronic sound as well as the acoustic: Does that change your perception of the conductor’s role?
Marianne mentioned that it made her “pay more attention to the things she does with the glove.” Peter wrote that the role of the actual “conducting” needed to be more complicated, and especially when it comes to metric changes, “it might change rather more.” Trine, on the other hand, noted that when the conductor has to keep track of the extended opportunities to “make mistakes, etc.,” that this might not be a positive additional role.
The extended role of the conductor through enabling control of the electronic sound did not change their perception of the conductor’s role. This finding shows that the aim of the ConDiS project to develop a system that is a direct continuation of the conductor’s classic conducting gestures has—in some ways—succeeded. That is also important from an artistic point of view since music performance is about the music, not about any extended role of a conductor or about technical solutions to technological problems.
What Peter said when talking about the complexity of the actual “conducting,” meaning the traditional conducting without the extension of ConDiS, is true. This was a compromise I made at the beginning, writing the whole piece in 4/4 with no metric changes. I was afraid that if I went too far in that direction, the whole project would become much too complex. And this would, as Trine remarked, produce extended opportunities for mistakes. While mistakes are an important part of live musical performance, whether their outcome is positive or negative, I was afraid that if the conducting job became too complicated, the music would become more about technical experiments than artistic (musical) quality. I do agree with Marianne when she writes, “I’m impressed that she has learned to use it as well as concentrating on everything else in the score.” I felt as though I needed to give the conductor a break. Perhaps I was wrong, perhaps I should have added metric changes into the composition. These questions can only be answered by writing a new piece of music.
- How does it feel watching the conductor using the ConDiS? Is it “natural”, confusing or distracting when she moves the conducting glove?
Answers to this question were quite emphatic in the sense that they all found it quite disturbing to see the conductor use the ConDiS conducting glove. Trine was very straight forward, writing that it was “Most disturbing.” She did not necessarily mean this in the sense of a visual disturbance, but was drawing more on a comment made by the conductor complaining about problems controlling volume and electronics. Marianne’s response was not too dissimilar from Trine’s, that she was “wondering if anything is going to go wrong.” Marianne mentioned the accident at the Harpa performance in which the battery fell off. Peter reflected on the possibility of “mistaking an expressive gesture in the left hand for something to do with the electronics and vice versa.”
It was surprising that what distracts the performers in watching the conductor is more their fear of hardware problems that the conductor cannot fix rather than any diversion created by her wearing the glove. I had imagined that the design of the glove or the object itself would be a visual distraction, but given their answers, it clearly is not. The fear of mistakes or failure is not new to performers, and it is interesting to see that crystalize in a fear of technical mistakes.
Only Peter mentioned the possibility that there would be confusion between conducting electronics and instruments in the expressive gestures in the left hand. This is a very valuable point, something that had me worried during the development process. When I made the decision to extend the conductor’s job by using gestures as close to her traditional conducting gestures as possible, I was fully aware that the “electronic” expressive conducting could be confused with the instrumental. I am therefore pleased to a certain extent that Peter added: “in ‘Kuuki’ it wasn´t really a problem, but I can imagine it might be in a different piece.” What Peter is saying is that in my composition I consciously avoided the danger of confusion between the electronic and instrumental expressive conducting gestures. Perhaps I did so unconsciously or, more likely, Halldis solved that problem herself with her conducting experience.
With the exception of the fear of technical problems and the battery falling off at the Harpa performance, the use of ConDiS was not distracting or confusing for the performers.
I had the feeling that as the tour went on, they paid less and less attention to the fact that Halldis was wearing a digital glove and that “the object” became less a part of the performance.
- Should additional information about the electronics be written in your musical part, such as reverb and delay? Is less more? Anything else?
Both Marianne and Peter were aware that too much information can be dangerous. Marianne did not think it was important since she was “not in charge of steering anything.” Peter had a similar opinion based on the fact that he did not “hear anything.” Trine, on the other hand, had a slightly different opinion, stating that it would have been nice to know what kind of effect had been intended. More importantly, she added her view that the performer should be able to “optimize the effects.”
Creating an equilibrium of information in a written instrumental score is an eternal problem. When is enough enough? In the original instrumental parts given to the performers, all information, meaning all electronic signs, were left in the parts. Like Trine commented, it was my opinion that it helps the performer to “optimize the effects.” I happened to be wrong; most of the performers got confused and asked for these signs to be left out in future versions.
Writing electronic signs into the instrumental score happened to be unnecessary. Why? First of all, the electronic signs have limited meaning for them since they are not used to these types of marks in a traditional score. In addition, classical musicians (like classical conductors) are not experienced in listening to their instruments extended with electronic sounds. Even if they did hear the extended electronic sound of their instrument, it might not help them much since they do not have the experience of linking their instrument to its electronic counterpart. Mixed music, or instrumental performance using digital sound processing, is still not part of their educational curriculum. Therefore, the notation of electronic information might be distracting or even confusing, like it could be for the conductor.
The other explanation might have to do with the difficulties in preserving a clear, audible relationship between their instrumental performative action and the electronic reaction, meaning the interplay between an individual instrument and its electronic counterpart would be recognizable. The performers complained when asked (not during rehearsal) that they did not hear clearly how the electronics responded to what they played. Marianne mentioned that the electronic signs were not needed since she was not in “charge of anything,” and Peter did not care since he could not “hear anything.” The reason Marianne felt as though she were not in “charge of anything” is, I believe, largely due to the fact that she could not hear very clearly the electronic response to her musical instrument.
I am convinced that if the response of the electronics had been more closely linked to their playing, and therefore more easily audible, they would have found a way to link the electronic signs to the instrumental score. Therefore, a good solution would have to be in the form of improved onstage monitoring. I thought of using headphones but gave it up, fearing it would cause even more trouble. Another plausible solution was to have a single monitor per musician. This proved to be too complex. There is a lot of work to be done, work I would love to tackle in the near future.
Reaction from the Audience
The following is a summary based on conversations I had with audience members right after each performance of Kuuki no Sukima. These conversations were guided by the following questions:
- What is your opinion of the idea of expanding the conductor role by conducting the electronic sounds?
- Is there an artistic gain?
- Can you describe your personal experience during the concert performance?
The most common answer to the expanded conductor’s role was: What did the conductor do with the glove? This was exactly the type of reaction I was hoping for since it proved to me that I had succeeded in one of my primary goals. Throughout the entire development and research process, my main goal was to expand the conductor’s ability to control the electronics, in as “natural” way as possible, without any extra-musical gestures or other show-off gimmicks. These responses also reflect an indirect answer that could be interpreted as a positive reaction.
Regarding artistic gain, the audience members’ responses were generally that they needed better insight and knowledge of the subject to be able to answer the question clearly. However, they agreed that they had experienced an exciting sonic world that was very exotic to them. They had experienced a performance that definitely contained artistic gain. The fact that the composition is more abstract sonic art than a tonal composition already makes it difficult for the audience to exactly pinpoint the artistic gain. For me there is an obvious answer: there is substantial artistic gain—I have extended my musical language and my musical sonic world through the Bridging the Gap – ConDiS project.
The overall expression of the audience, when asked about their personal experience of the performance, was that it was a wonderful piece, a dreamy piece, meditative, ritual, one in which electronics strongly supported that experience without any interference from the technical implementation. I especially recall the words of composer Sunleif Rasmussen when he described the work as a spiritual experience that would be exceptionally well at home performed in cathedrals or churches. Recorder player Michala Petri believed she had rarely experienced such an equally good balance between electronics and acoustics. She considered the idea of leaving the total sound control in the hands of the conductor to be great. Electronic composer Rikhardur H. Fridriksson was less convinced and thought the idea of having the conductor in charge of the electronics was dangerous. He felt the electronics were way too soft and he was generally disturbed by watching the conductor in charge of the electronic sounds.
Finally, I would like to quote Eiríkur Pálsson, trumpetist with the Iceland Symphony Orchestra, who wrote to me: Minnistætt hvað verkið var notalegt áheyrnar og svolítið draumkennt. Tækni þín, eða elektróníkin gaf því aukna dýpt eða kannski svona þrívídd sem undirstrikaði stemminguna í verkinu án þess að vera áberandi eða þannig að hún væri aðalatriðið eða eitthvað sem ætti að taka sérstaklega eftir.
Roughly translated:
My recollection of the work was pleasant and somewhat dreamy. Your technology, or the electronics, gave it a greater depth, or perhaps a three-dimensional perspective that underlined the mood of the work. All without the technology being prominent or being the main thing or something that should be specifically noticed.
[1]See the “Reflections from the Performers” section.